早就开始计划写 Kafka 源码分析的文章,但却一直迟迟没有动手,直到看到一位同事的博客 编程小梦 ,彻底受到了打击,这位同事是去年本科毕业,年龄算起来应该比我小两岁,但是非常厉害,在刚工作半年的时候就成为了 Apache Kylin 的 commiter,看到身边同事这么优秀,而且还这么努力 (编程小梦-我的书单 ),自己实在没有理由不努力了,因此,在 github 上给自己提了一个 issue Kafka 源码分析系列 ,希望自己能够在未来半年里,至少每两周输出一篇 Kafka 源码分析的文章,本文是这个系列的第一篇 —— Producer 的发送模型(以 Kafka 0.10.2 为例)。
前言 Kafka,作为目前在大数据领域应用最为广泛的消息队列,其内部实现和设计有很多值得深入研究和分析的地方。
再 0.10.2 的 Kafka 中,其 Client 端是由 Java 实现,Server 端是由 Scala 来实现的,在使用 Kafka 时,Client 是用户最先接触到部分,因此,计划写的源码分析也会从 Client 端开始,会先从 Producer 端开始,今天讲的是 Producer 端的发送模型的实现。
Producer 使用 在分析 Producer 发送模型之前,先看一下用户是如何使用 Producer 向 Kafka 写数据的,下面是一个关于 Producer 最简单的应用示例。
1
2
3
4
5
6
7
8
9
10
11
12
13
14
15
16
17
18
19
20
21
22
23
24
25
26
27
28
29
30
31
import org.apache.kafka.clients.producer.KafkaProducer;import org.apache.kafka.clients.producer.ProducerRecord;import org.apache.kafka.clients.producer.Producer;import java.util.Properties;public class ProducerTest private static String topicName; private static int msgNum; private static int key; public static void main (String[] args) Properties props = new Properties(); props.put("bootstrap.servers" , "127.0.0.1:9092,127.0.0.2:9092" ); props.put("key.serializer" , "org.apache.kafka.common.serialization.StringSerializer" ); props.put("value.serializer" , "org.apache.kafka.common.serialization.StringSerializer" ); topicName = "test" ; msgNum = 10 ; Producer<String, String> producer = new KafkaProducer<>(props); for (int i = 0 ; i < msgNum; i++) { String msg = i + " This is matt's blog." ; producer.send(new ProducerRecord<String, String>(topicName, msg)); } producer.close(); } }
从上面的代码可以看出 Kafka 为用户提供了非常简单的 API,在使用时,只需要如下两步:
初始化 KafkaProducer 实例;
调用 send 接口发送数据。
本文主要是围绕着 Producer 在内部是如何实现 send 接口而展开的。
Producer 数据发送流程 下面通过对 send 源码分析来一步步剖析 Producer 数据的发送流程。
Producer 的 send 实现 用户是直接使用 producer.send() 发送的数据,先看一下 send() 接口的实现
1 2 3 4 5 6 7 8 9 10 11 12 13 @Override public Future<RecordMetadata> send (ProducerRecord<K, V> record) return send(record, null ); } @Override public Future<RecordMetadata> send (ProducerRecord<K, V> record, Callback callback) ProducerRecord<K, V> interceptedRecord = this .interceptors == null ? record : this .interceptors.onSend(record); return doSend(interceptedRecord, callback); }
数据发送的最终实现还是调用了 Producer 的 doSend() 接口。
Producer 的 doSend 实现 下面是 doSend() 的具体实现
1
2
3
4
5
6
7
8
9
10
11
12
13
14
15
16
17
18
19
20
21
22
23
24
25
26
27
28
29
30
31
32
33
34
35
36
37
38
39
40
41
42
43
44
45
46
47
48
49
50
51
52
53
54
55
56
57
58
59
60
61
62
63
64
65
66
67
68
69
70
71
private Future<RecordMetadata> doSend (ProducerRecord<K, V> record, Callback callback) TopicPartition tp = null ; try { ClusterAndWaitTime clusterAndWaitTime = waitOnMetadata(record.topic(), record.partition(), maxBlockTimeMs); long remainingWaitMs = Math.max(0 , maxBlockTimeMs - clusterAndWaitTime.waitedOnMetadataMs); Cluster cluster = clusterAndWaitTime.cluster; byte [] serializedKey; try { serializedKey = keySerializer.serialize(record.topic(), record.key()); } catch (ClassCastException cce) { throw new SerializationException("Can't convert key of class " + record.key().getClass().getName() + " to class " + producerConfig.getClass(ProducerConfig.KEY_SERIALIZER_CLASS_CONFIG).getName() + " specified in key.serializer" ); } byte [] serializedValue; try { serializedValue = valueSerializer.serialize(record.topic(), record.value()); } catch (ClassCastException cce) { throw new SerializationException("Can't convert value of class " + record.value().getClass().getName() + " to class " + producerConfig.getClass(ProducerConfig.VALUE_SERIALIZER_CLASS_CONFIG).getName() + " specified in value.serializer" ); } int partition = partition(record, serializedKey, serializedValue, cluster); int serializedSize = Records.LOG_OVERHEAD + Record.recordSize(serializedKey, serializedValue); ensureValidRecordSize(serializedSize); tp = new TopicPartition(record.topic(), partition); long timestamp = record.timestamp() == null ? time.milliseconds() : record.timestamp(); log.trace("Sending record {} with callback {} to topic {} partition {}" , record, callback, record.topic(), partition); Callback interceptCallback = this .interceptors == null ? callback : new InterceptorCallback<>(callback, this .interceptors, tp); RecordAccumulator.RecordAppendResult result = accumulator.append(tp, timestamp, serializedKey, serializedValue, interceptCallback, remainingWaitMs); if (result.batchIsFull || result.newBatchCreated) { log.trace("Waking up the sender since topic {} partition {} is either full or getting a new batch" , record.topic(), partition); this .sender.wakeup(); } return result.future; } catch (ApiException e) { log.debug("Exception occurred during message send:" , e); if (callback != null ) callback.onCompletion(null , e); this .errors.record(); if (this .interceptors != null ) this .interceptors.onSendError(record, tp, e); return new FutureFailure(e); } catch (InterruptedException e) { this .errors.record(); if (this .interceptors != null ) this .interceptors.onSendError(record, tp, e); throw new InterruptException(e); } catch (BufferExhaustedException e) { this .errors.record(); this .metrics.sensor("buffer-exhausted-records" ).record(); if (this .interceptors != null ) this .interceptors.onSendError(record, tp, e); throw e; } catch (KafkaException e) { this .errors.record(); if (this .interceptors != null ) this .interceptors.onSendError(record, tp, e); throw e; } catch (Exception e) { if (this .interceptors != null ) this .interceptors.onSendError(record, tp, e); throw e; } }
在 dosend() 方法的实现上,一条 Record 数据的发送,可以分为以下五步:
确认数据要发送到的 topic 的 metadata 是可用的(如果该 partition 的 leader 存在则是可用的,如果开启权限时,client 有相应的权限),如果没有 topic 的 metadata 信息,就需要获取相应的 metadata;
序列化 record 的 key 和 value;
获取该 record 要发送到的 partition(可以指定,也可以根据算法计算);
向 accumulator 中追加 record 数据,数据会先进行缓存;
如果追加完数据后,对应的 RecordBatch 已经达到了 batch.size 的大小(或者batch 的剩余空间不足以添加下一条 Record),则唤醒 sender 线程发送数据。
数据的发送过程,可以简单总结为以上五点,下面会这几部分的具体实现进行详细分析。
发送过程详解 Producer 通过 waitOnMetadata() 方法来获取对应 topic 的 metadata 信息,这部分后面会单独抽出一篇文章来介绍,这里就不再详述,总结起来就是:在数据发送前,需要先该 topic 是可用的。
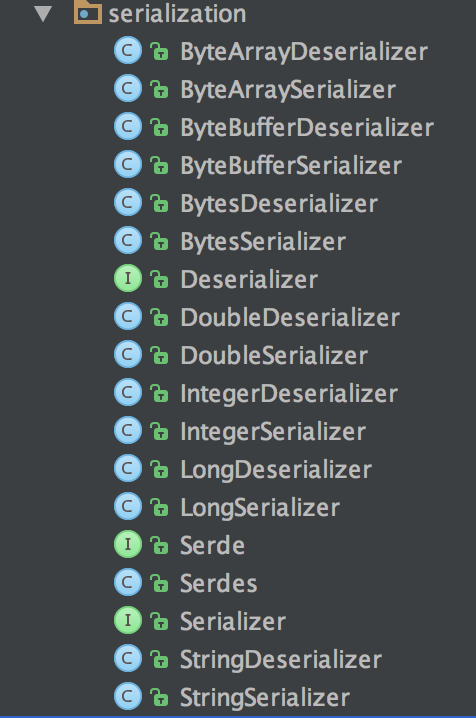
key 和 value 的序列化 Producer 端对 record 的 key 和 value 值进行序列化操作,在 Consumer 端再进行相应的反序列化,Kafka 内部提供的序列化和反序列化算法如下图所示:
当然我们也是可以自定义序列化的具体实现,不过一般情况下,Kafka 内部提供的这些方法已经足够使用。
获取 partition 值 关于 partition 值的计算,分为三种情况:
指明 partition 的情况下,直接将指明的值直接作为 partiton 值;
没有指明 partition 值但有 key 的情况下,将 key 的 hash 值与 topic 的 partition 数进行取余得到 partition 值;
既没有 partition 值又没有 key 值的情况下,第一次调用时随机生成一个整数(后面每次调用在这个整数上自增),将这个值与 topic 可用的 partition 总数取余得到 partition 值,也就是常说的 round-robin 算法。
具体实现如下:
1 2 3 4 5 6 7 8 private int partition (ProducerRecord<K, V> record, byte [] serializedKey, byte [] serializedValue, Cluster cluster) Integer partition = record.partition(); return partition != null ? partition : partitioner.partition( record.topic(), record.key(), serializedKey, record.value(), serializedValue, cluster); }
Producer 默认使用的 partitioner 是 org.apache.kafka.clients.producer.internals.DefaultPartitioner,用户也可以自定义 partition 的策略,下面是这个类两个方法的具体实现:
1
2
3
4
5
6
7
8
9
10
11
12
13
14
15
16
17
18
19
20
21
22
23
24
25
26
27
28
29
30
public int partition (String topic, Object key, byte [] keyBytes, Object value, byte [] valueBytes, Cluster cluster) List<PartitionInfo> partitions = cluster.partitionsForTopic(topic); int numPartitions = partitions.size(); if (keyBytes == null ) { int nextValue = nextValue(topic); List<PartitionInfo> availablePartitions = cluster.availablePartitionsForTopic(topic); if (availablePartitions.size() > 0 ) { int part = Utils.toPositive(nextValue) % availablePartitions.size(); return availablePartitions.get(part).partition(); } else { return Utils.toPositive(nextValue) % numPartitions; } } else { return Utils.toPositive(Utils.murmur2(keyBytes)) % numPartitions; } } private int nextValue (String topic) AtomicInteger counter = topicCounterMap.get(topic); if (null == counter) { counter = new AtomicInteger(new Random().nextInt()); AtomicInteger currentCounter = topicCounterMap.putIfAbsent(topic, counter); if (currentCounter != null ) { counter = currentCounter; } } return counter.getAndIncrement(); }
这就是 Producer 中默认的 partitioner 实现。
向 accumulator 写数据 Producer 会先将 record 写入到 buffer 中,当达到一个 batch.size 的大小时,再唤起 sender 线程去发送 RecordBatch(第五步),这里先详细分析一下 Producer 是如何向 buffer 中写入数据的。
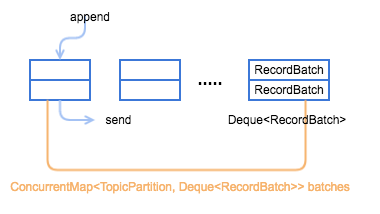
Producer 是通过 RecordAccumulator 实例追加数据,RecordAccumulator 模型如下图所示,一个重要的变量就是 ConcurrentMap<TopicPartition, Deque<RecordBatch>> batches,每个 TopicPartition 都会对应一个 Deque<RecordBatch>,当添加数据时,会向其 topic-partition 对应的这个 queue 最新创建的一个 RecordBatch 中添加 record,而发送数据时,则会先从 queue 中最老的那个 RecordBatch 开始发送。
1 2 3 4 5 6 7 8 9 10 11 12 13 14 15 16 17 18 19 20 21 22 23 24 25 26 27 28 29 30 31 32 33 34 35 36 37 38 39 40 41 42 43 44 45 46 47 public RecordAppendResult append (TopicPartition tp, long timestamp, byte [] key, byte [] value, Callback callback, long maxTimeToBlock) throws InterruptedException appendsInProgress.incrementAndGet(); try { Deque<RecordBatch> dq = getOrCreateDeque(tp); synchronized (dq) { if (closed) throw new IllegalStateException("Cannot send after the producer is closed." ); RecordAppendResult appendResult = tryAppend(timestamp, key, value, callback, dq); if (appendResult != null ) return appendResult; } int size = Math.max(this .batchSize, Records.LOG_OVERHEAD + Record.recordSize(key, value)); log.trace("Allocating a new {} byte message buffer for topic {} partition {}" , size, tp.topic(), tp.partition()); ByteBuffer buffer = free.allocate(size, maxTimeToBlock); synchronized (dq) { if (closed) throw new IllegalStateException("Cannot send after the producer is closed." ); RecordAppendResult appendResult = tryAppend(timestamp, key, value, callback, dq); if (appendResult != null ) { free.deallocate(buffer); return appendResult; } MemoryRecordsBuilder recordsBuilder = MemoryRecords.builder(buffer, compression, TimestampType.CREATE_TIME, this .batchSize); RecordBatch batch = new RecordBatch(tp, recordsBuilder, time.milliseconds()); FutureRecordMetadata future = Utils.notNull(batch.tryAppend(timestamp, key, value, callback, time.milliseconds())); dq.addLast(batch); incomplete.add(batch); return new RecordAppendResult(future, dq.size() > 1 || batch.isFull(), true ); } } finally { appendsInProgress.decrementAndGet(); } }
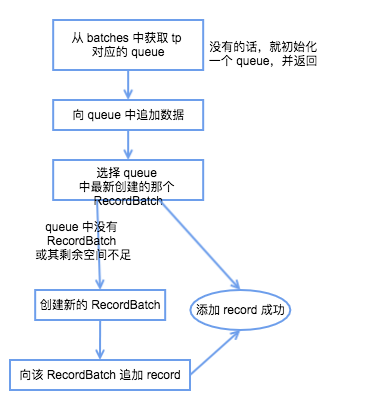
总结一下其 record 写入的具体流程如下图所示:
获取该 topic-partition 对应的 queue,没有的话会创建一个空的 queue;
向 queue 中追加数据,先获取 queue 中最新加入的那个 RecordBatch,如果不存在或者存在但剩余空余不足以添加本条 record 则返回 null,成功写入的话直接返回结果,写入成功;
创建一个新的 RecordBatch,初始化内存大小根据 max(batch.size, Records.LOG_OVERHEAD + Record.recordSize(key, value)) 来确定(防止单条 record 过大的情况);
向新建的 RecordBatch 写入 record,并将 RecordBatch 添加到 queue 中,返回结果,写入成功。
发送 RecordBatch 当 record 写入成功后,如果发现 RecordBatch 已满足发送的条件(通常是 queue 中有多个 batch,那么最先添加的那些 batch 肯定是可以发送了),那么就会唤醒 sender 线程,发送 RecordBatch。
sender 线程对 RecordBatch 的处理是在 run() 方法中进行的,该方法具体实现如下:
1
2
3
4
5
6
7
8
9
10
11
12
13
14
15
16
17
18
19
20
21
22
23
24
25
26
27
28
29
30
31
32
33
34
35
36
37
38
39
40
41
42
43
44
45
46
47
48
49
50
void run (long now) Cluster cluster = metadata.fetch(); RecordAccumulator.ReadyCheckResult result = this .accumulator.ready(cluster, now); if (!result.unknownLeaderTopics.isEmpty()) { for (String topic : result.unknownLeaderTopics) this .metadata.add(topic); this .metadata.requestUpdate(); } Iterator<Node> iter = result.readyNodes.iterator(); long notReadyTimeout = Long.MAX_VALUE; while (iter.hasNext()) { Node node = iter.next(); if (!this .client.ready(node, now)) { iter.remove(); notReadyTimeout = Math.min(notReadyTimeout, this .client.connectionDelay(node, now)); } } Map<Integer, List<RecordBatch>> batches = this .accumulator.drain(cluster, result.readyNodes, this .maxRequestSize, now); if (guaranteeMessageOrder) { for (List<RecordBatch> batchList : batches.values()) { for (RecordBatch batch : batchList) this .accumulator.mutePartition(batch.topicPartition); } } List<RecordBatch> expiredBatches = this .accumulator.abortExpiredBatches(this .requestTimeout, now); for (RecordBatch expiredBatch : expiredBatches) this .sensors.recordErrors(expiredBatch.topicPartition.topic(), expiredBatch.recordCount); sensors.updateProduceRequestMetrics(batches); long pollTimeout = Math.min(result.nextReadyCheckDelayMs, notReadyTimeout); if (!result.readyNodes.isEmpty()) { log.trace("Nodes with data ready to send: {}" , result.readyNodes); pollTimeout = 0 ; } sendProduceRequests(batches, now); this .client.poll(pollTimeout, now); }
这段代码前面有很多是其他的逻辑处理,如:移除暂时不可用的 node、处理由于元数据不可用导致的超时 RecordBatch,真正进行发送发送 RecordBatch 的是 sendProduceRequests(batches, now) 这个方法,具体是:
1 2 3 4 5 6 7 8 9 10 11 12 13 14 15 16 17 18 19 20 21 22 23 24 25 26 27 28 29 30 31 32 33 34 private void sendProduceRequests (Map<Integer, List<RecordBatch>> collated, long now) for (Map.Entry<Integer, List<RecordBatch>> entry : collated.entrySet()) sendProduceRequest(now, entry.getKey(), acks, requestTimeout, entry.getValue()); } private void sendProduceRequest (long now, int destination, short acks, int timeout, List<RecordBatch> batches) Map<TopicPartition, MemoryRecords> produceRecordsByPartition = new HashMap<>(batches.size()); final Map<TopicPartition, RecordBatch> recordsByPartition = new HashMap<>(batches.size()); for (RecordBatch batch : batches) { TopicPartition tp = batch.topicPartition; produceRecordsByPartition.put(tp, batch.records()); recordsByPartition.put(tp, batch); } ProduceRequest.Builder requestBuilder = new ProduceRequest.Builder(acks, timeout, produceRecordsByPartition); RequestCompletionHandler callback = new RequestCompletionHandler() { public void onComplete (ClientResponse response) handleProduceResponse(response, recordsByPartition, time.milliseconds()); } }; String nodeId = Integer.toString(destination); ClientRequest clientRequest = client.newClientRequest(nodeId, requestBuilder, now, acks != 0 , callback); client.send(clientRequest, now); log.trace("Sent produce request to {}: {}" , nodeId, requestBuilder); }
这段代码就简单很多,总来起来就是,将 batches 中 leader 为同一个 node 的所有 RecordBatch 放在一个请求中进行发送。
最后 本文是对 Kafka Producer 端发送模型的一个简单分析,下一篇文章将会详细介绍 metadata 相关的内容,包括 metadata 的内容以及在 Producer 端 metadata 的更新机制。