本篇文章是 Flink 系列 的第五篇,从这篇开始会向大家介绍一下 Flink Runtime 中涉及到的分布式调度相关的内容。Flink 本身也是 Master/Slave 架构(当前的架构是在 FLIP-6 - Flink Deployment and Process Model - Standalone, Yarn, Mesos, Kubernetes, etc 中实现的),这个 Master 节点就类似于 Storm 中 Nimbus 节点,它负责整个集群的一些协调工作,Flink 中 Master 节点主要包含三大组件:Flink Resource Manager、Flink Dispatcher 以及为每个运行的 Job 创建一个 JobManager 服务,本篇文章主要给大家介绍一下 Flink 中 Master 节点相关内容。

这里要说明的一点是:通常我们认为 Flink 集群的 master 节点就是 JobManager,slave 节点就是 TaskManager 或者 TaskExecutor(见:Distributed Runtime Environment),这本身是没有什么问题的。但这里需要强调一下,在本文中集群的 Master 节点暂时就叫做 Master 节点,而负责每个作业调度的服务,这里叫做 JobManager/JobMaster(现在源码的实现中对应的类是 JobMaster)。集群的 Master 节点的工作范围与 JobManager 的工作范围还是有所不同的,而且 Master 节点的其中一项工作职责就是为每个提交的作业创建一个 JobManager 对象,用来处理这个作业相关协调工作,比如:task 的调度、Checkpoint 的触发及失败恢复等,JobManager 的内容将会在下篇文章单独讲述,本文主要聚焦 Master 节点除 JobManager 之外的工作。

Flink 的 Master 节点包含了三个组件: Dispatcher、ResourceManager 和 JobManager。其中:

  1. Dispatcher: 负责接收用户提供的作业,并且负责为这个新提交的作业拉起一个新的 JobManager 服务;
  2. ResourceManager: 负责资源的管理,在整个 Flink 集群中只有一个 ResourceManager,资源相关的内容都由这个服务负责;
  3. JobManager: 负责管理具体某个作业的执行,在一个 Flink 集群中可能有多个作业同时执行,每个作业都会有自己的 JobManager 服务。

Flink 的架构图(来自官网)

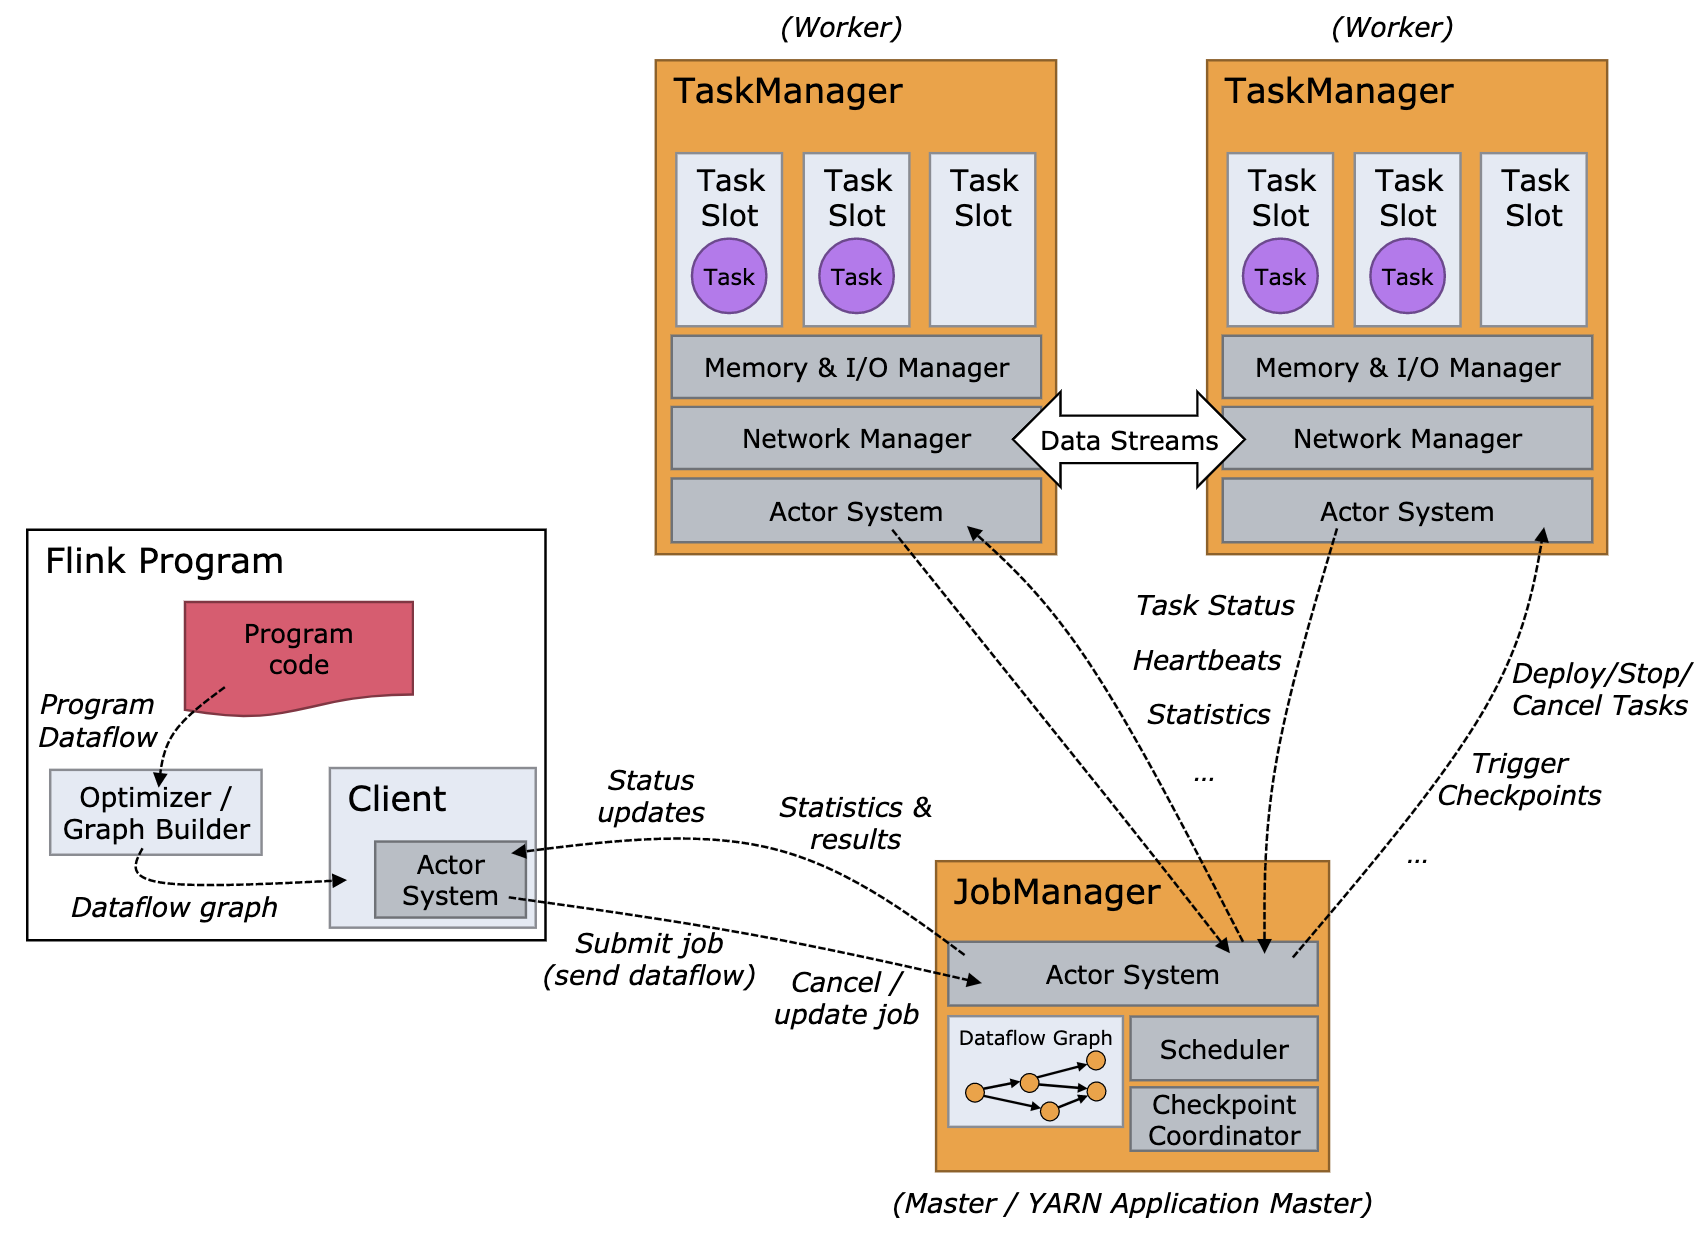
根据上面的 Flink 的架构图(等把 runtime 的内容介绍完,届时会画一张更细的 Flink 的架构图,现在先以官方的图来看),当用户开始提交一个作业,首先会将用户编写的代码转化为一个 JobGraph(参考这个系列前面的文章),在这个过程中,它会进行一些检查或优化相关的工作(比如:检查配置,把可以 Chain 在一起算子 Chain 在一起)。然后,Client 再将生成的 JobGraph 提交到集群中执行。此时有两种情况(对于两种不同类型的集群):

  1. 类似于 Standalone 这种 Session 模式(对于 YARN 模式来说),这种情况下 Client 可以直接与 Dispatcher 建立连接并提交作业;
  2. 是 Per-Job 模式,这种情况下 Client 首先向资源管理系统 (如 Yarn)申请资源来启动 ApplicationMaster,然后再向 ApplicationMaster 中的 Dispatcher 提交作业。

当作业到 Dispatcher 后,Dispatcher 会首先启动一个 JobManager 服务,然后 JobManager 会向 ResourceManager 申请资源来启动作业中具体的任务。ResourceManager 选择到空闲的 Slot (Flink 架构-基本概念)之后,就会通知相应的 TM 将该 Slot 分配给指定的 JobManager。

Master 启动整体流程

Flink 集群 Master 节点在初始化时,会先调用 ClusterEntrypoint 的 runClusterEntrypoint() 方法启动集群,其整体流程如下图所示:

Flink Master 启动的整体流程

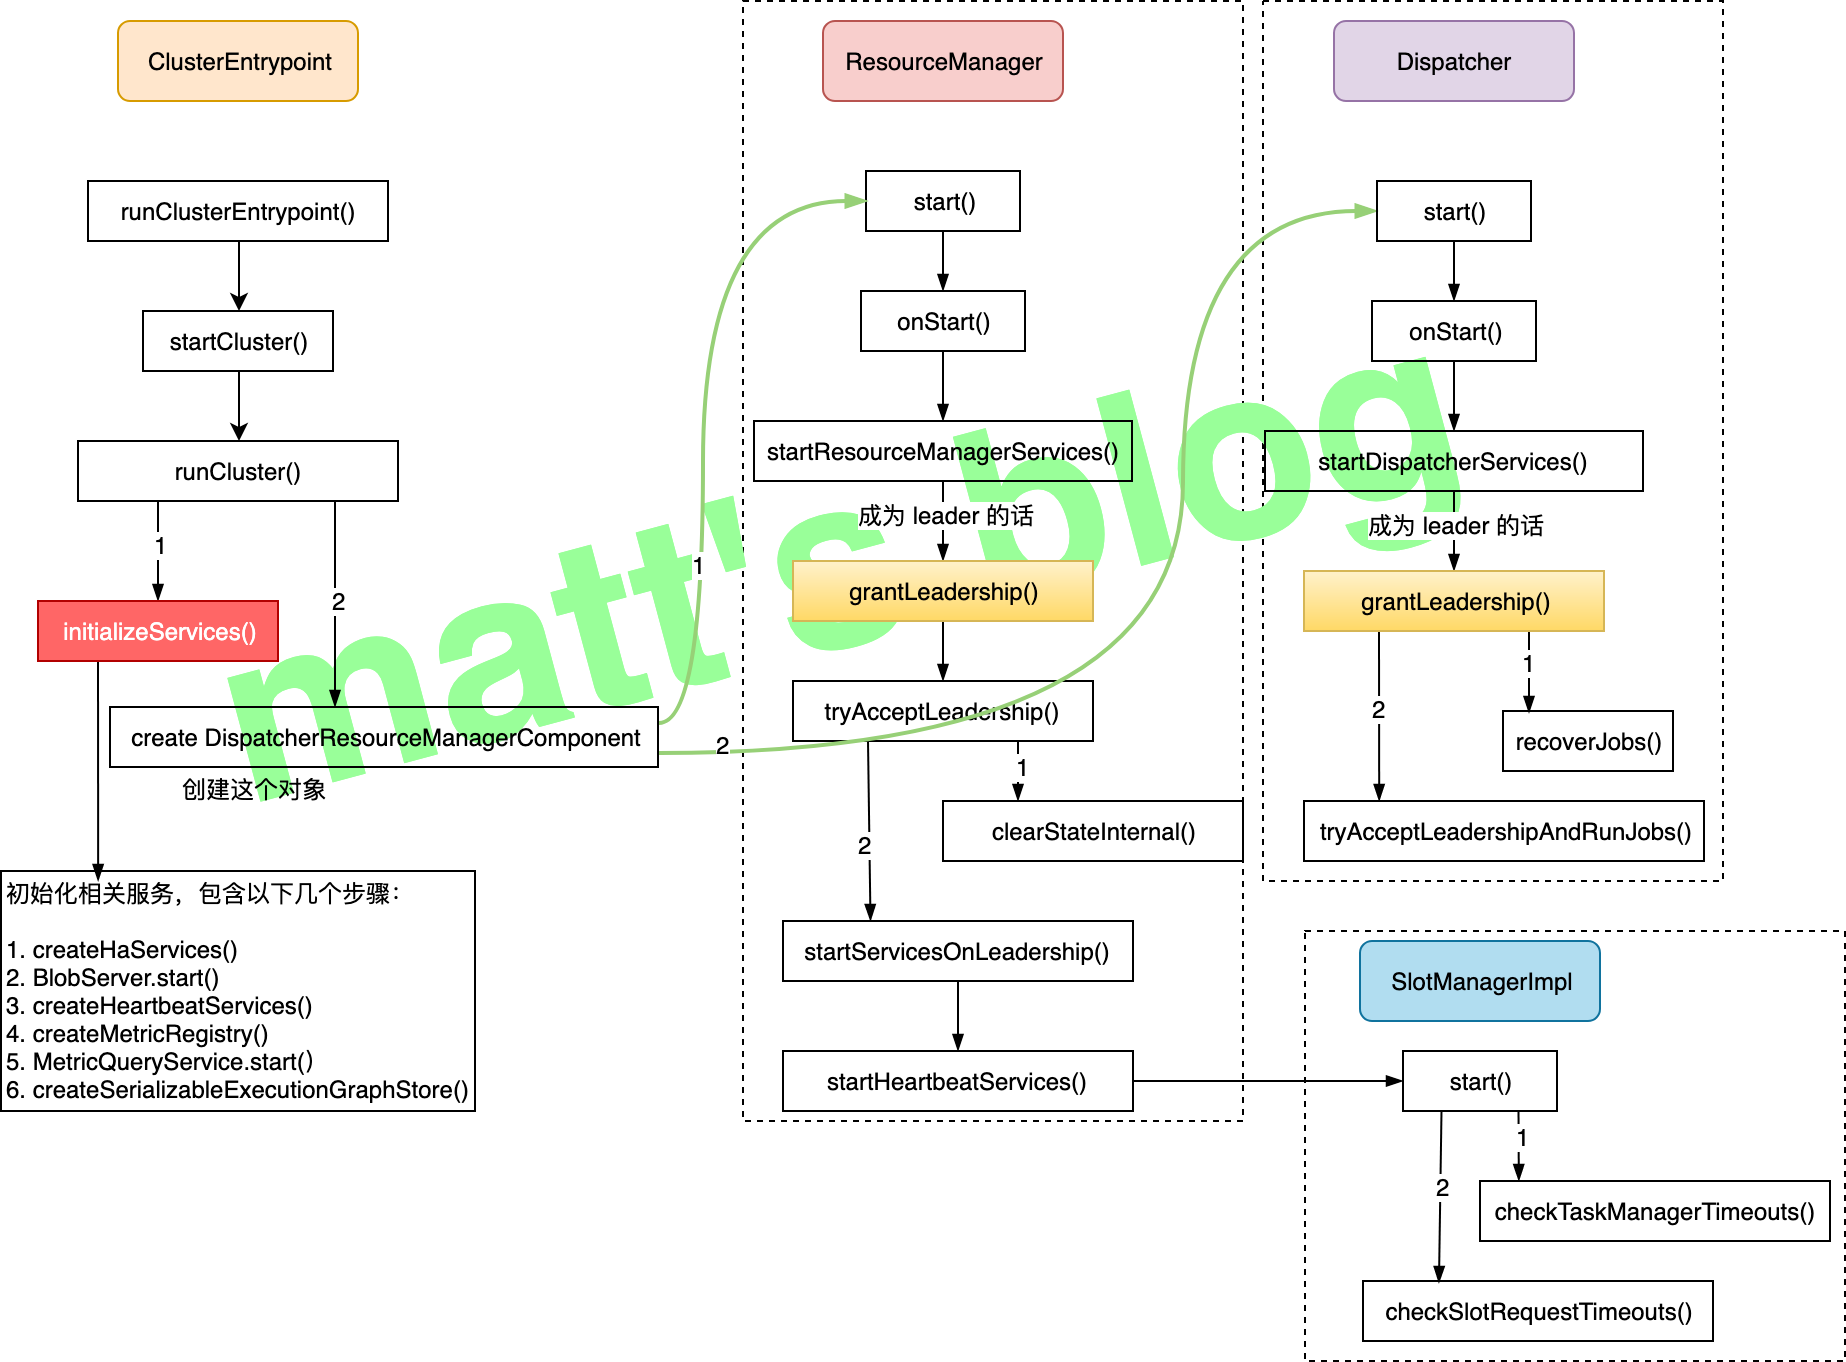
上图流程中 runCluster() 方法的实现如下:

1
2
3
4
5
6
7
8
9
10
11
12
13
14
15
16
17
18
19
20
21
22
23
24
25
26
27
28
29
30
31
32
33
34
35
36
37
38
39
40
41
42
43
44
// ClusterEntrypoint.java
//note: run cluster real start-point
private void runCluster(Configuration configuration) throws Exception {
synchronized (lock) {
//note: 首先会初始化相关的服务(这里会涉及到一系列的服务)
initializeServices(configuration);

// write host information into configuration
configuration.setString(JobManagerOptions.ADDRESS, commonRpcService.getAddress());
configuration.setInteger(JobManagerOptions.PORT, commonRpcService.getPort());

final DispatcherResourceManagerComponentFactory<?> dispatcherResourceManagerComponentFactory = createDispatcherResourceManagerComponentFactory(configuration);

//note: 创建 DispatcherResourceManagerComponent 对象(前面初始化的服务,都在这里使用了)
clusterComponent = dispatcherResourceManagerComponentFactory.create(
configuration,
commonRpcService,
haServices,
blobServer,
heartbeatServices,
metricRegistry,
archivedExecutionGraphStore,
new RpcMetricQueryServiceRetriever(metricRegistry.getMetricQueryServiceRpcService()),
this);

clusterComponent.getShutDownFuture().whenComplete(
(ApplicationStatus applicationStatus, Throwable throwable) -> {
if (throwable != null) {
//note: 抛出异常的情况下
shutDownAsync(
ApplicationStatus.UNKNOWN,
ExceptionUtils.stringifyException(throwable),
false);
} else {
// This is the general shutdown path. If a separate more specific shutdown was
// already triggered, this will do nothing
shutDownAsync(
applicationStatus,
null,
true);
}
});
}
}

这个方法主要分为下面两个步骤:

  1. initializeServices(): 初始化相关的服务,都是 Master 节点将会使用到的一些服务;
  2. create DispatcherResourceManagerComponent: 这里会创建一个 DispatcherResourceManagerComponent 对象,这个对象在创建的时候会启动 DispatcherResourceManager 服务。

下面来详细看下具体实现。

initializeServices

initializeServices() 初始化一些基本的服务,具体的代码实现如下:

1
2
3
4
5
6
7
8
9
10
11
12
13
14
15
16
17
18
19
20
21
22
23
24
25
26
27
28
29
30
31
32
33
34
35
36
37
38
39
40
41
// ClusterEntrypoint.java
//note: 初始化相关的服务
protected void initializeServices(Configuration configuration) throws Exception {

LOG.info("Initializing cluster services.");

synchronized (lock) {
final String bindAddress = configuration.getString(JobManagerOptions.ADDRESS);
final String portRange = getRPCPortRange(configuration);

//note: 创建 RPC 服务
commonRpcService = createRpcService(configuration, bindAddress, portRange);

// update the configuration used to create the high availability services
//note: 根据当前创建的 RPC 服务信息做相关的配置(之前设置的端口可能是一个 range)
configuration.setString(JobManagerOptions.ADDRESS, commonRpcService.getAddress());
configuration.setInteger(JobManagerOptions.PORT, commonRpcService.getPort());

//note: 用于 IO 的线程池
ioExecutor = Executors.newFixedThreadPool(
Hardware.getNumberCPUCores(),
new ExecutorThreadFactory("cluster-io"));
//note: HA service(跟用户配置有关,可以是 NONE、ZooKeeper 也可以自定义的类)
haServices = createHaServices(configuration, ioExecutor);
//note: 初始化 Blob Server
blobServer = new BlobServer(configuration, haServices.createBlobStore());
blobServer.start();
//note: heartbeat service
heartbeatServices = createHeartbeatServices(configuration);
//note: metrics reporter
metricRegistry = createMetricRegistry(configuration);

//note: 创建了一个 Flink 内部的 metrics rpc service
final RpcService metricQueryServiceRpcService = MetricUtils.startMetricsRpcService(configuration, bindAddress);
//note: start MetricQueryService
metricRegistry.startQueryService(metricQueryServiceRpcService, null);

//note: 创建一个 ArchivedExecutionGraphStore 对象,用于存储用户作业的物理 graph
archivedExecutionGraphStore = createSerializableExecutionGraphStore(configuration, commonRpcService.getScheduledExecutor());
}
}

上述流程涉及到服务有:

  1. RpcService: 创建一个 rpc 服务;
  2. HighAvailabilityServices: HA service 相关的实现,它的作用有很多,比如:处理 ResourceManager 的 leader 选举、JobManager leader 的选举等;
  3. BlobServer: 主要管理一些大文件的上传等,比如用户作业的 jar 包、TM 上传 log 文件等(Blob 是指二进制大对象也就是英文 Binary Large Object 的缩写);
  4. HeartbeatServices: 初始化一个心跳服务;
  5. MetricRegistryImpl: metrics 相关的服务;
  6. ArchivedExecutionGraphStore: 存储 execution graph 的服务,默认有两种实现,MemoryArchivedExecutionGraphStore 主要是在内存中缓存,FileArchivedExecutionGraphStore 会持久化到文件系统,也会在内存中缓存。

这些服务都会在前面第二步创建 DispatcherResourceManagerComponent 对象时使用到。

create DispatcherResourceManagerComponent

创建 DispatcherResourceManagerComponent 对象的实现如下:

1
2
3
4
5
6
7
8
9
10
11
12
13
14
15
16
17
18
19
20
21
22
23
24
25
26
27
28
29
30
31
32
33
34
35
36
37
38
39
40
41
42
43
44
45
46
47
48
49
50
51
52
53
54
55
56
57
58
59
60
61
62
63
64
65
66
67
68
69
70
71
72
73
74
75
76
77
78
79
80
81
82
83
84
85
86
87
88
89
90
91
92
93
94
95
96
97
98
99
100
101
102
103
104
105
106
107
108
109
110
111
112
113
114
115
116
117
118
119
120
121
122
123
124
125
126
127
128
129
130
131
132
133
134
// AbstractDispatcherResourceManagerComponentFactory.java
//note: 创建 DispatcherResourceManagerComponent 对象
@Override
public DispatcherResourceManagerComponent<T> create(
Configuration configuration,
RpcService rpcService,
HighAvailabilityServices highAvailabilityServices,
BlobServer blobServer,
HeartbeatServices heartbeatServices,
MetricRegistry metricRegistry,
ArchivedExecutionGraphStore archivedExecutionGraphStore,
MetricQueryServiceRetriever metricQueryServiceRetriever,
FatalErrorHandler fatalErrorHandler) throws Exception {

LeaderRetrievalService dispatcherLeaderRetrievalService = null;
LeaderRetrievalService resourceManagerRetrievalService = null;
WebMonitorEndpoint<U> webMonitorEndpoint = null;
ResourceManager<?> resourceManager = null;
JobManagerMetricGroup jobManagerMetricGroup = null;
T dispatcher = null;

try {
//note: 用于 Dispatcher leader 选举
dispatcherLeaderRetrievalService = highAvailabilityServices.getDispatcherLeaderRetriever();

//note: 用于 Resource Manager leader 选举(对于使用 zk 的 HA 模式来说,与上面的区别是使用的路径不同)
resourceManagerRetrievalService = highAvailabilityServices.getResourceManagerLeaderRetriever();

//note: Dispatcher 的 Gateway
final LeaderGatewayRetriever<DispatcherGateway> dispatcherGatewayRetriever = new RpcGatewayRetriever<>(
rpcService,
DispatcherGateway.class,
DispatcherId::fromUuid,
10,
Time.milliseconds(50L));

//note: ResourceManager 的 Gateway
final LeaderGatewayRetriever<ResourceManagerGateway> resourceManagerGatewayRetriever = new RpcGatewayRetriever<>(
rpcService,
ResourceManagerGateway.class,
ResourceManagerId::fromUuid,
10,
Time.milliseconds(50L));

//note: 它主要使用 web 前端的 rest 接口调用
final ExecutorService executor = WebMonitorEndpoint.createExecutorService(
configuration.getInteger(RestOptions.SERVER_NUM_THREADS),
configuration.getInteger(RestOptions.SERVER_THREAD_PRIORITY),
"DispatcherRestEndpoint");

//note: metrics Fetcher
final long updateInterval = configuration.getLong(MetricOptions.METRIC_FETCHER_UPDATE_INTERVAL);
final MetricFetcher metricFetcher = updateInterval == 0
? VoidMetricFetcher.INSTANCE
: MetricFetcherImpl.fromConfiguration(
configuration,
metricQueryServiceRetriever,
dispatcherGatewayRetriever,
executor);

//note: standalone 模式下,这里创建的是 DispatcherRestEndpoint 对象
webMonitorEndpoint = restEndpointFactory.createRestEndpoint(
configuration,
dispatcherGatewayRetriever,
resourceManagerGatewayRetriever,
blobServer,
executor,
metricFetcher,
highAvailabilityServices.getWebMonitorLeaderElectionService(),
fatalErrorHandler);

//note: 启动 DispatcherRestEndpoint
log.debug("Sarting Dispatcher REST endptoint.");
webMonitorEndpoint.start();

final String hostname = getHostname(rpcService);

jobManagerMetricGroup = MetricUtils.instantiateJobManagerMetricGroup(
metricRegistry,
hostname,
ConfigurationUtils.getSystemResourceMetricsProbingInterval(configuration));

//note: 创建 ResourceManager 对象(StandAlone 模式,这里创建的是 StandaloneResourceManager 对象)
resourceManager = resourceManagerFactory.createResourceManager(
configuration,
ResourceID.generate(),
rpcService,
highAvailabilityServices,
heartbeatServices,
metricRegistry,
fatalErrorHandler,
new ClusterInformation(hostname, blobServer.getPort()),
webMonitorEndpoint.getRestBaseUrl(),
jobManagerMetricGroup);

final HistoryServerArchivist historyServerArchivist = HistoryServerArchivist.createHistoryServerArchivist(configuration, webMonitorEndpoint);

//note: 创建 dispatcher 对象(StandAlone 模式下,创建的是 StandaloneDispatcher 对象)
dispatcher = dispatcherFactory.createDispatcher(
configuration,
rpcService,
highAvailabilityServices,
resourceManagerGatewayRetriever,
blobServer,
heartbeatServices,
jobManagerMetricGroup,
metricRegistry.getMetricQueryServiceGatewayRpcAddress(),
archivedExecutionGraphStore,
fatalErrorHandler,
historyServerArchivist);

//note: 启动 ResourceManager
log.debug("Starting ResourceManager.");
resourceManager.start();
resourceManagerRetrievalService.start(resourceManagerGatewayRetriever); //note: 监听 leader

//note: 启动 Dispatcher
log.debug("Starting Dispatcher.");
dispatcher.start();
dispatcherLeaderRetrievalService.start(dispatcherGatewayRetriever);

return createDispatcherResourceManagerComponent(
dispatcher,
resourceManager,
dispatcherLeaderRetrievalService,
resourceManagerRetrievalService,
webMonitorEndpoint,
jobManagerMetricGroup);

} catch (Exception exception) {
//note: 清除前面启动的所有服务的组件
// ...
}
}

在上面的方法实现中,Master 中的两个重要服务就是在这里初始化并启动的:

  1. Dispatcher: 初始化并启动这个服务,如果 JM 启动了 HA 模式,这里会竞选 leader,只有是 leader 的 Dispatcher 才会真正对外提供服务(参考前面图中的流程);
  2. ResourceManager: 这个跟 Dispatcher 有点类似。

Master 各个服务详解

这里,我们来详细看下 Master 使用到各个服务组件,并做下详细的介绍。

Dispatcher

Dispatcher 主要是用于作业的提交、并把它们持久化、为作业创建对应的 JobManager 等,Client 端提交的 JobGraph 就是提交给了 Dispatcher 服务,这里先看一下一个 Dispatcher 对象被选举为 leader 后是如何初始化的,如果当前的 Dispatcher 被选举为 leader,则会调用其 grantLeadership() 方法,该方法实现如下:

1
2
3
4
5
6
7
8
9
10
11
12
13
14
15
16
17
18
19
20
21
22
23
24
25
26
27
28
29
30
31
32
33
34
35
36
37
38
39
40
41
42
43
44
45
46
47
48
49
50
51
52
// Dispatcher.java
/**
* Callback method when current resourceManager is granted leadership.
*
* note: 如果当前的 dispatcher 是 leader 的情况下
* @param newLeaderSessionID unique leadershipID
*/
@Override
public void grantLeadership(final UUID newLeaderSessionID) {
runAsyncWithoutFencing(
() -> {
log.info("Dispatcher {} was granted leadership with fencing token {}", getAddress(), newLeaderSessionID);

//note: 通过 recoverJobs() 方法先从 job graph store 中恢复所有的 jobs
final CompletableFuture<Collection<JobGraph>> recoveredJobsFuture = recoveryOperation.thenApplyAsync(
FunctionUtils.uncheckedFunction(ignored -> recoverJobs()),
getRpcService().getExecutor());

//note: 通过 tryAcceptLeadershipAndRunJobs() 调用 runJob 启动前面的每一个 job
final CompletableFuture<Boolean> fencingTokenFuture = recoveredJobsFuture.thenComposeAsync(
(Collection<JobGraph> recoveredJobs) -> tryAcceptLeadershipAndRunJobs(newLeaderSessionID, recoveredJobs),
getUnfencedMainThreadExecutor());

final CompletableFuture<Void> confirmationFuture = fencingTokenFuture.thenCombineAsync(
recoveredJobsFuture,
BiFunctionWithException.unchecked((Boolean confirmLeadership, Collection<JobGraph> recoveredJobs) -> {
if (confirmLeadership) {
//note: 如果是 leader,并且前面两步都完成的话,就会走到这里
leaderElectionService.confirmLeaderSessionID(newLeaderSessionID);
} else {
for (JobGraph recoveredJob : recoveredJobs) {
//note: 从 job graph store 中删除这些作业相关的 state
submittedJobGraphStore.releaseJobGraph(recoveredJob.getJobID());
}
}
return null;
}),
getRpcService().getExecutor());

confirmationFuture.whenComplete(
(Void ignored, Throwable throwable) -> {
if (throwable != null) {
onFatalError(
new DispatcherException(
String.format("Failed to take leadership with session id %s.", newLeaderSessionID),
(ExceptionUtils.stripCompletionException(throwable))));
}
});

recoveryOperation = confirmationFuture;
});
}

Dispatcher 被选举为 leader 后,它主要的操作步骤如下:

  1. recoverJobs(): 先从 job graph store 恢复所有作业的 JobGraph;
  2. tryAcceptLeadershipAndRunJobs(): 启动前面恢复的每个作业,这里要说明的是,目前看到的 1.9 的实现,这里会将前面所有的作业都会重启,我在看的时候是有点懵逼的,这个 HA 有点伪 HA,相当于 leader 切换之后,作业就必须要得重启恢复,这个代价是有点大的,不过也看到社区有改进的计划(FLINK-10333 这个进度有点慢);

我们这里再详细看下 Dispatcher 对外提供了哪些 API 实现(这些接口主要还是 DispatcherGateway 中必须要实现的接口),通过这些 API,其实就很容易看出它到底对外提供了哪些功能,提供的 API 有:

  1. listJobs(): 列出当前提交的作业列表;
  2. submitJob(): 向集群提交作业;
  3. getBlobServerPort(): 返回 blob server 的端口;
  4. requestJob(): 根据 jobId 请求一个作业的 ArchivedExecutionGraph(它是这个作业 ExecutionGraph 序列化后的形式);
  5. disposeSavepoint(): 清理指定路径的 savepoint 状态信息;
  6. cancelJob(): 取消一个指定的作业;
  7. requestClusterOverview(): 请求这个集群的全局信息,比如:集群有多少个 slot,有多少可用的 slot,有多少个作业等等;
  8. requestMultipleJobDetails(): 返回当前集群正在执行的作业详情,返回对象是 JobDetails 列表;
  9. requestJobStatus(): 请求一个作业的作业状态(返回的类型是 JobStatus);
  10. requestOperatorBackPressureStats(): 请求一个 Operator 的反压情况;
  11. requestJobResult(): 请求一个 job 的 JobResult
  12. requestMetricQueryServiceAddresses(): 请求 MetricQueryService 的地址;
  13. requestTaskManagerMetricQueryServiceAddresses(): 请求 TaskManager 的 MetricQueryService 的地址;
  14. triggerSavepoint(): 使用指定的目录触发一个 savepoint;
  15. stopWithSavepoint(): 停止当前的作业,并在停止前做一次 savepoint;
  16. shutDownCluster(): 关闭集群;

通过 Dispatcher 提供的 API 可以看出,Dispatcher 服务主要有功能有:

  1. 提交/取消作业;
  2. 触发/取消/清理 一个作业的 savepoint;
  3. 作业状态/列表查询;

Dispatcher 这里主要处理的还是 Job 相关的请求,对外提供了统一的接口。

ResourceManager

ResourceManager 从名字就可以看出,它主要是资源管理相关的服务,如果其被选举为 leader,实现如下,它会清除缓存中的数据,然后启动 SlotManager 服务:

1
2
3
4
5
6
7
8
9
10
11
12
13
14
15
16
17
18
19
20
21
22
23
24
25
26
27
28
29
30
31
32
33
34
35
36
37
38
39
40
41
42
43
44
45
46
47
48
49
50
51
52
53
54
55
56
57
58
59
60
// ResourceManager.java
/**
* Callback method when current resourceManager is granted leadership.
*
* note:如果当前的 resourceManager 被选举为 leader 的话,就执行这个方法
* @param newLeaderSessionID unique leadershipID
*/
@Override
public void grantLeadership(final UUID newLeaderSessionID) {
//note: tryAcceptLeadership() 清除之前 leader 的信息,这里会重新初始化 leader 相关的信息,并启动 SlotManager 服务
final CompletableFuture<Boolean> acceptLeadershipFuture = clearStateFuture
.thenComposeAsync((ignored) -> tryAcceptLeadership(newLeaderSessionID), getUnfencedMainThreadExecutor());

final CompletableFuture<Void> confirmationFuture = acceptLeadershipFuture.thenAcceptAsync(
(acceptLeadership) -> {
if (acceptLeadership) {
// confirming the leader session ID might be blocking,
leaderElectionService.confirmLeaderSessionID(newLeaderSessionID);
}
},
getRpcService().getExecutor());

confirmationFuture.whenComplete(
(Void ignored, Throwable throwable) -> {
if (throwable != null) {
onFatalError(ExceptionUtils.stripCompletionException(throwable));
}
});
}

private CompletableFuture<Boolean> tryAcceptLeadership(final UUID newLeaderSessionID) {
if (leaderElectionService.hasLeadership(newLeaderSessionID)) {
final ResourceManagerId newResourceManagerId = ResourceManagerId.fromUuid(newLeaderSessionID);

log.info("ResourceManager {} was granted leadership with fencing token {}", getAddress(), newResourceManagerId);

// clear the state if we've been the leader before
//note: 清除之前的状态
if (getFencingToken() != null) {
clearStateInternal();
}

setFencingToken(newResourceManagerId);

//note: 本节点启动 leader 服务
startServicesOnLeadership();

return prepareLeadershipAsync().thenApply(ignored -> true);
} else {
return CompletableFuture.completedFuture(false);
}
}

protected void startServicesOnLeadership() {
//note: 启动心跳服务
startHeartbeatServices();

//note: 启动 slotManager
slotManager.start(getFencingToken(), getMainThreadExecutor(), new ResourceActionsImpl());
}

这里也来看下 ResourceManager 对外提供的 API(ResourceManagerGateway 相关方法的实现):

  1. registerJobManager(): 在 ResourceManager 中注册一个 JobManager 对象,一个作业启动后,JobManager 初始化后会调用这个方法;
  2. registerTaskExecutor(): 在 ResourceManager 中注册一个 TaskExecutorTaskExecutor 实际上就是一个 TaskManager),当一个 TaskManager 启动后,会主动向 ResourceManager 注册;
  3. sendSlotReport(): TM 向 ResourceManager 发送 SlotReportSlotReport 包含了这个 TaskExecutor 的所有 slot 状态信息,比如:哪些 slot 是可用的、哪些 slot 是已经被分配的、被分配的 slot 分配到哪些 Job 上了等);
  4. heartbeatFromTaskManager(): 向 ResourceManager 发送来自 TM 的心跳信息;
  5. heartbeatFromJobManager(): 向 ResourceManager 发送来自 JM 的心跳信息;
  6. disconnectTaskManager(): TM 向 ResourceManager 发送一个断开连接的请求;
  7. disconnectJobManager(): JM 向 ResourceManager 发送一个断开连接的请求;
  8. requestSlot(): JM 向 ResourceManager 请求 slot 资源;
  9. cancelSlotRequest(): JM 向 ResourceManager 发送一个取消 slot 申请的请求;
  10. notifySlotAvailable(): TM 向 ResourceManager 发送一个请求,通知 ResourceManager 某个 slot 现在可用了(TM 端某个 slot 的资源被释放,可以再进行分配了);
  11. deregisterApplication(): 向资源管理系统(比如:yarn、mesos)申请关闭当前的 Flink 集群,一般是在关闭集群的时候调用的;
  12. requestTaskManagerInfo(): 请求当前注册到 ResourceManager 的 TM 的详细信息(返回的类型是 TaskManagerInfo,可以请求的是全部的 TM 列表,也可以是根据某个 ResourceID 请求某个具体的 TM);
  13. requestResourceOverview(): 向 ResourceManager 请求资源概况,返回的类型是 ResourceOverview,它包括注册的 TM 数量、注册的 slot 数、可用的 slot 数等;
  14. requestTaskManagerMetricQueryServiceAddresses(): 请求 TM MetricQueryService 的地址信息;
  15. requestTaskManagerFileUpload(): 向 TM 发送一个文件上传的请求,这里上传的是 TM 的 LOG/STDOUT 类型的文件,文件会上传到 Blob Server,这里会拿到一个 BlobKey(Blobkey 实际上是文件名的一部分,通过 BlobKey 可以确定这个文件的物理位置信息);

从上面的 API 列表中,可以看出 ResourceManager 的主要功能是:

  1. JobManager/TaskManager 资源的注册/心跳监控/连接断开的处理;
  2. 处理/取消 JM 资源(slot)的申请;
  3. 提供资源信息查询;
  4. 向 TM 发送请求,触发其 LOG/STDOUT 文件上传到 BlobServer;

ResourceManager 在启动的时候,也会启动一个 SlotManager 服务,TM 相关的 slot 资源都是在 SlotManager 中维护的。

SlotManager

SlotManager 会维护所有从 TaskManager 注册过来的 slot(包括它们的分配情况)以及所有 pending 的 SlotRequest(所有的 slot 请求都会先放到 pending 列表中,然后再去判断是否可以满足其资源需求)。只要有新的 slot 注册或者旧的 slot 资源释放,SlotManager 都会检测 pending SlotRequest 列表,检查是否有 SlotRequest 可以满足,如果可以满足,就会将资源分配给这个 SlotRequest;如果没有足够可用的 slot,SlotManager 会尝试着申请新的资源(比如:申请一个 worker 启动)。

当然,为了资源及时释放和避免资源浪费,空转的 task manager(它当前已经分配的 slot 并未使用)和 pending slot request 在 timeout 之后将会分别触发它们的释放和失败(对应的方法实现是 checkTaskManagerTimeouts()checkSlotRequestTimeouts())。

SlotManager 对外的提供的 API 如下(SlotManager 中必须要实现的接口,实现类是 SlotManagerImpl):

  1. getNumberRegisteredSlots(): 获取注册的 slot 的总数量;
  2. getNumberRegisteredSlotsOf(): 获取某个 TM 注册的 slot 的数量;
  3. getNumberFreeSlots(): 获取当前可用的(还未分配的 slot) slot 的数量;
  4. getNumberFreeSlotsOf(): 获取某个 TM 当前可用的 slot 的数量;
  5. getNumberPendingTaskManagerSlots(): 获取 pendingSlots 中 slot 的数量(pendingSlots 记录的是 SlotManager 主动去向资源管理系统申请的资源,该系统在一些情况下会新启动 worker 来创建资源,但这些slot 还没有主动汇报过来,就会暂时先放到 pendingSlots 中,如果 TM 过来注册的话,该 slot 就会从 pendingSlots 中移除,存储到其他对象中);
  6. getNumberPendingSlotRequests(): 获取 pendingSlotRequests 列表的数量,这个集合中存储的是收到的、还没分配的 SlotRequest 列表,当一个 SlotRequest 发送过来之后,会先存储到这个集合中,当分配完成后,才会从这个集合中移除;
  7. registerSlotRequest(): JM 发送一个 slot 请求(这里是 ResourceManager 通过 requestSlot() 接口调用的);
  8. unregisterSlotRequest(): 取消或移除一个正在排队(可能已经在处理中)的 SlotRequest;
  9. registerTaskManager(): 注册一个 TM,这里会将 TM 中所有的 slot 注册过来,等待后面分配;
  10. unregisterTaskManager(): 取消一个 TM 的注册(比如:关闭的时候可能会调用),这里会将这个 TM 上所有的 slot 都移除,会先从缓存中移除,然后再通知 JM 这个 slot 分配失败;
  11. reportSlotStatus(): TM 汇报当前 slot 分配的情况,SlotManager 会将其更新到自己的缓存中;
  12. freeSlot(): 释放一个指定的 slot,如果这个 slot 之前已经被分配出去了,这里会更新其状态,将其状态改为 FREE
  13. setFailUnfulfillableRequest(): 遍历 pendingSlotRequests 列表,如果这些 slot 请求现在还分配不到合适的资源,这里会将其设置为 fail,会通知 JM slot 分配失败。

同样,从上面的 API 列表中,总结一下 SlotManager 的功能:

  1. 提供 slot 相关的信息查询;
  2. 处理/取消 JM 发送的 SlotRequest;
  3. 注册/取消 一个 TM(该 TM 涉及到的所有 slot 都会被注册或取消);
  4. Slot 资源的释放;

其他服务

Master 除了上面的服务,还启动了其他的服务,这里简单列一下:

  1. BlobServer: 它是 Flink 用来管理二进制大文件的服务,Flink JobManager 中启动的 BlobServer 负责监听请求并派发线程去处理(这个将会在下篇文章中讲述);
  2. JobManager: Dispatcher 会为每个作业创建一个 JobManager 对象,它用来处理这个作业相关的协调工作,比如:task 的调度、Checkpoint 的触发及失败恢复等(这个也会在下篇文章中讲述);
  3. HA service: Flink HA 的实现目前是依赖了 ZK,使用 curator 这个包来实现的,有兴趣的可以看下 Curator leader 选举(一) 这篇文章。

小节

到这里,终于就把 Flink Master 相关内容的一部分梳理完了,这里简单总结一下:

  1. Dispatcher: 负责接收用户提供的作业,并且负责为这个新提交的作业拉起一个新的 JobManager 组件,它主要还是处理 Job 相关的请求,对外提供了统一的接口抽象;
  2. ResourceManager: 负责资源的管理,所有资源相关的请求都是 ResourceManager 中处理的;
  3. JobManager: 负责管理具体作业的执行;

Flink Master 这部分的抽象还是比较好的,三大组件各司其职。当然还有一些需要改善的地方,比如:为什么不抽象一个 Master 类,然后把这些子服务全都放到 Master 类里,这样代码看起来会清晰舒服很多,现在的代码对初学者其实并不友好。


参考