本篇文章是 Flink 系列 的第四篇,紧接着前面两篇文章,在前两篇文章中介绍的 StreamGraph 和 JobGraph 都是在 client 端生成的,本文将会讲述 JobGraph 是如何转换成 ExecutionGraph 的。当 JobGraph 从 client 端提交到 JobManager 端后,JobManager 会根据 JobGraph 生成对应的 ExecutionGraph,ExecutionGraph 是 Flink 作业调度时使用到的核心数据结构,它包含每一个并行的 task、每一个 intermediate stream 以及它们之间的关系,本篇将会详细分析一下 JobGraph 转换为 ExecutionGraph 的流程。

Create ExecutionGraph 的整体流程

当用户向一个 Flink 集群提交一个作业后,JobManager 会接收到 Client 相应的请求,JobManager 会先做一些初始化相关的操作(也就是 JobGraph 到 ExecutionGraph 的转化),当这个转换完成后,才会根据 ExecutionGraph 真正在分布式环境中调度当前这个作业,而 JobManager 端处理的整体流程如下:

一个新作业提交后的处理流程

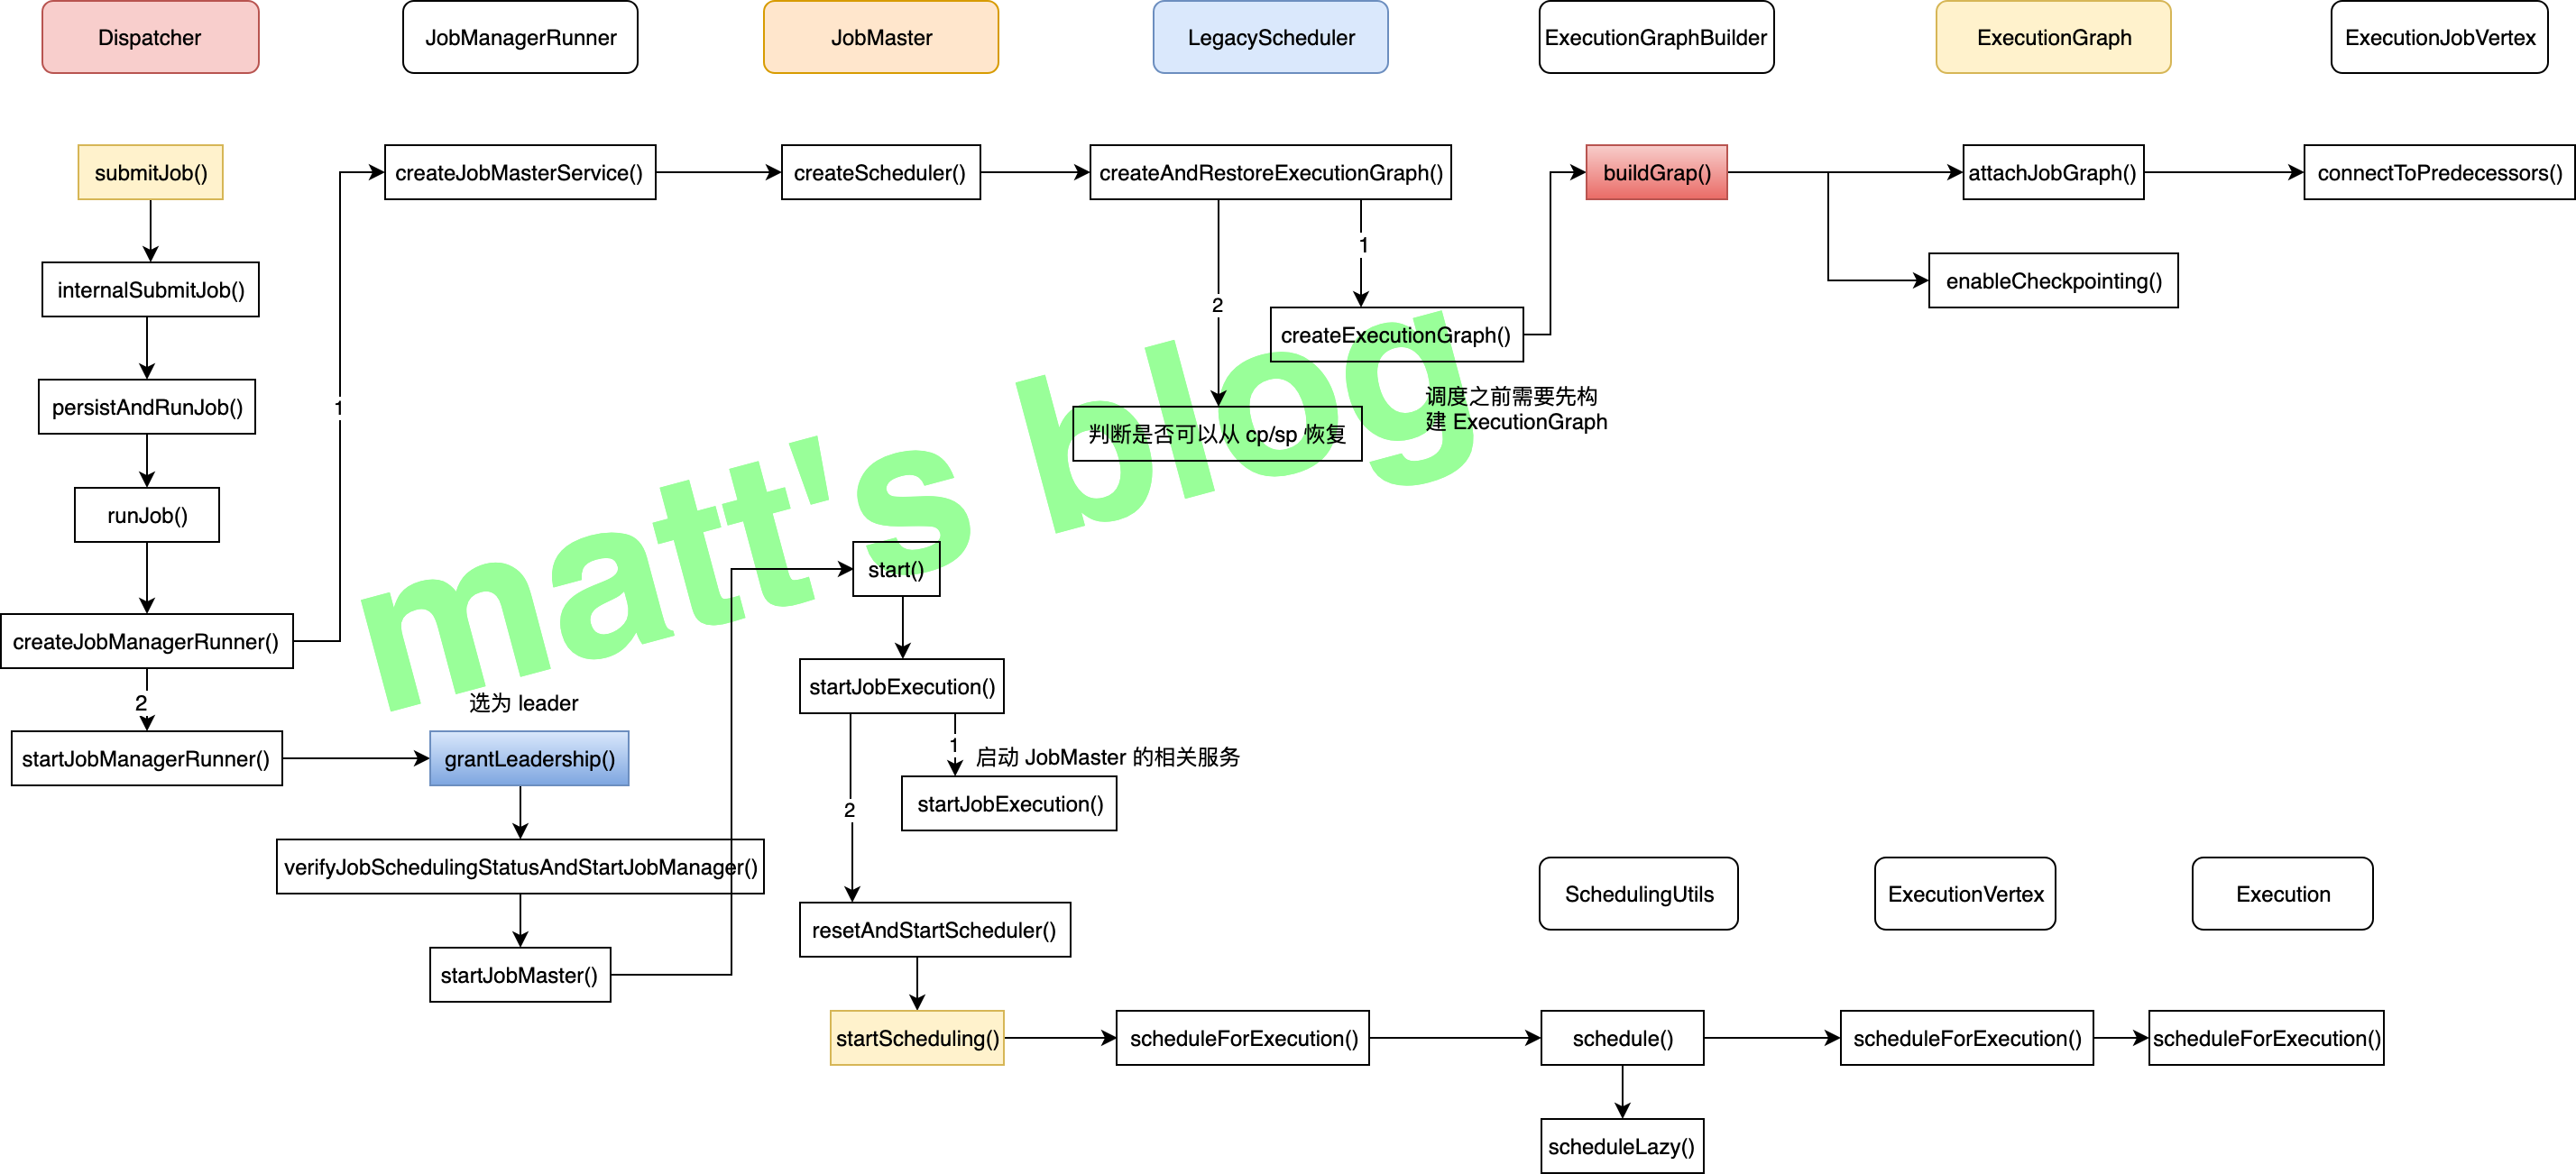
上图是一个作业提交后,在 JobManager 端的处理流程,本篇文章主要聚焦于 ExecutionGraph 的生成过程,也就是图中的红色节点,即 ExecutionGraphBuilder 的 buildGraph() 方法,这个方法就是根据 JobGraph 及相关的配置来创建 ExecutionGraph 对象的核心方法。

具体实现逻辑

这里将会详细来讲述 ExecutionGraphBuilder buildGraph() 方法的详细实现。

基本概念

ExecutionGraph 引入了几个基本概念,先简单介绍一下这些概念,对于理解 ExecutionGraph 有较大帮助:

  • ExecutionJobVertex: 在 ExecutionGraph 中,节点对应的是 ExecutionJobVertex,它是与 JobGraph 中的 JobVertex 一一对应,实际上每个 ExexutionJobVertex 也都是由一个 JobVertex 生成;
  • ExecutionVertex: 在 ExecutionJobVertex 中有一个 taskVertices 变量,它是 ExecutionVertex 类型的数组,数组的大小就是这个 JobVertex 的并发度,在创建 ExecutionJobVertex 对象时,会创建相同并发度梳理的 ExecutionVertex 对象,在真正调度时,一个 ExecutionVertex 实际就是一个 task,它是 ExecutionJobVertex 并行执行的一个子任务;
  • Execution: Execution 是对 ExecutionVertex 的一次执行,通过 ExecutionAttemptId 来唯一标识,一个 ExecutionVertex 在某些情况下可能会执行多次,比如遇到失败的情况或者该 task 的数据需要重新计算时;
  • IntermediateResult: 在 JobGraph 中用 IntermediateDataSet 表示 JobVertex 的输出 stream,一个 JobGraph 可能会有多个输出 stream,在 ExecutionGraph 中,与之对应的就是 IntermediateResult 对象;
  • IntermediateResultPartition: 由于 ExecutionJobVertex 可能有多个并行的子任务,所以每个 IntermediateResult 可能就有多个生产者,每个生产者的在相应的 IntermediateResult 上的输出对应一个 IntermediateResultPartition 对象,IntermediateResultPartition 表示的是 ExecutionVertex 的一个输出分区;
  • ExecutionEdge: ExecutionEdge 表示 ExecutionVertex 的输入,通过 ExecutionEdge 将 ExecutionVertex 和 IntermediateResultPartition 连接起来,进而在 ExecutionVertex 和 IntermediateResultPartition 之间建立联系。

从这些基本概念中,也可以看出以下几点:

  1. 由于每个 JobVertex 可能有多个 IntermediateDataSet,所以每个 ExecutionJobVertex 可能有多个 IntermediateResult,因此,每个 ExecutionVertex 也可能会包含多个 IntermediateResultPartition;
  2. ExecutionEdge 这里主要的作用是把 ExecutionVertexIntermediateResultPartition 连接起来,表示它们之间的连接关系。

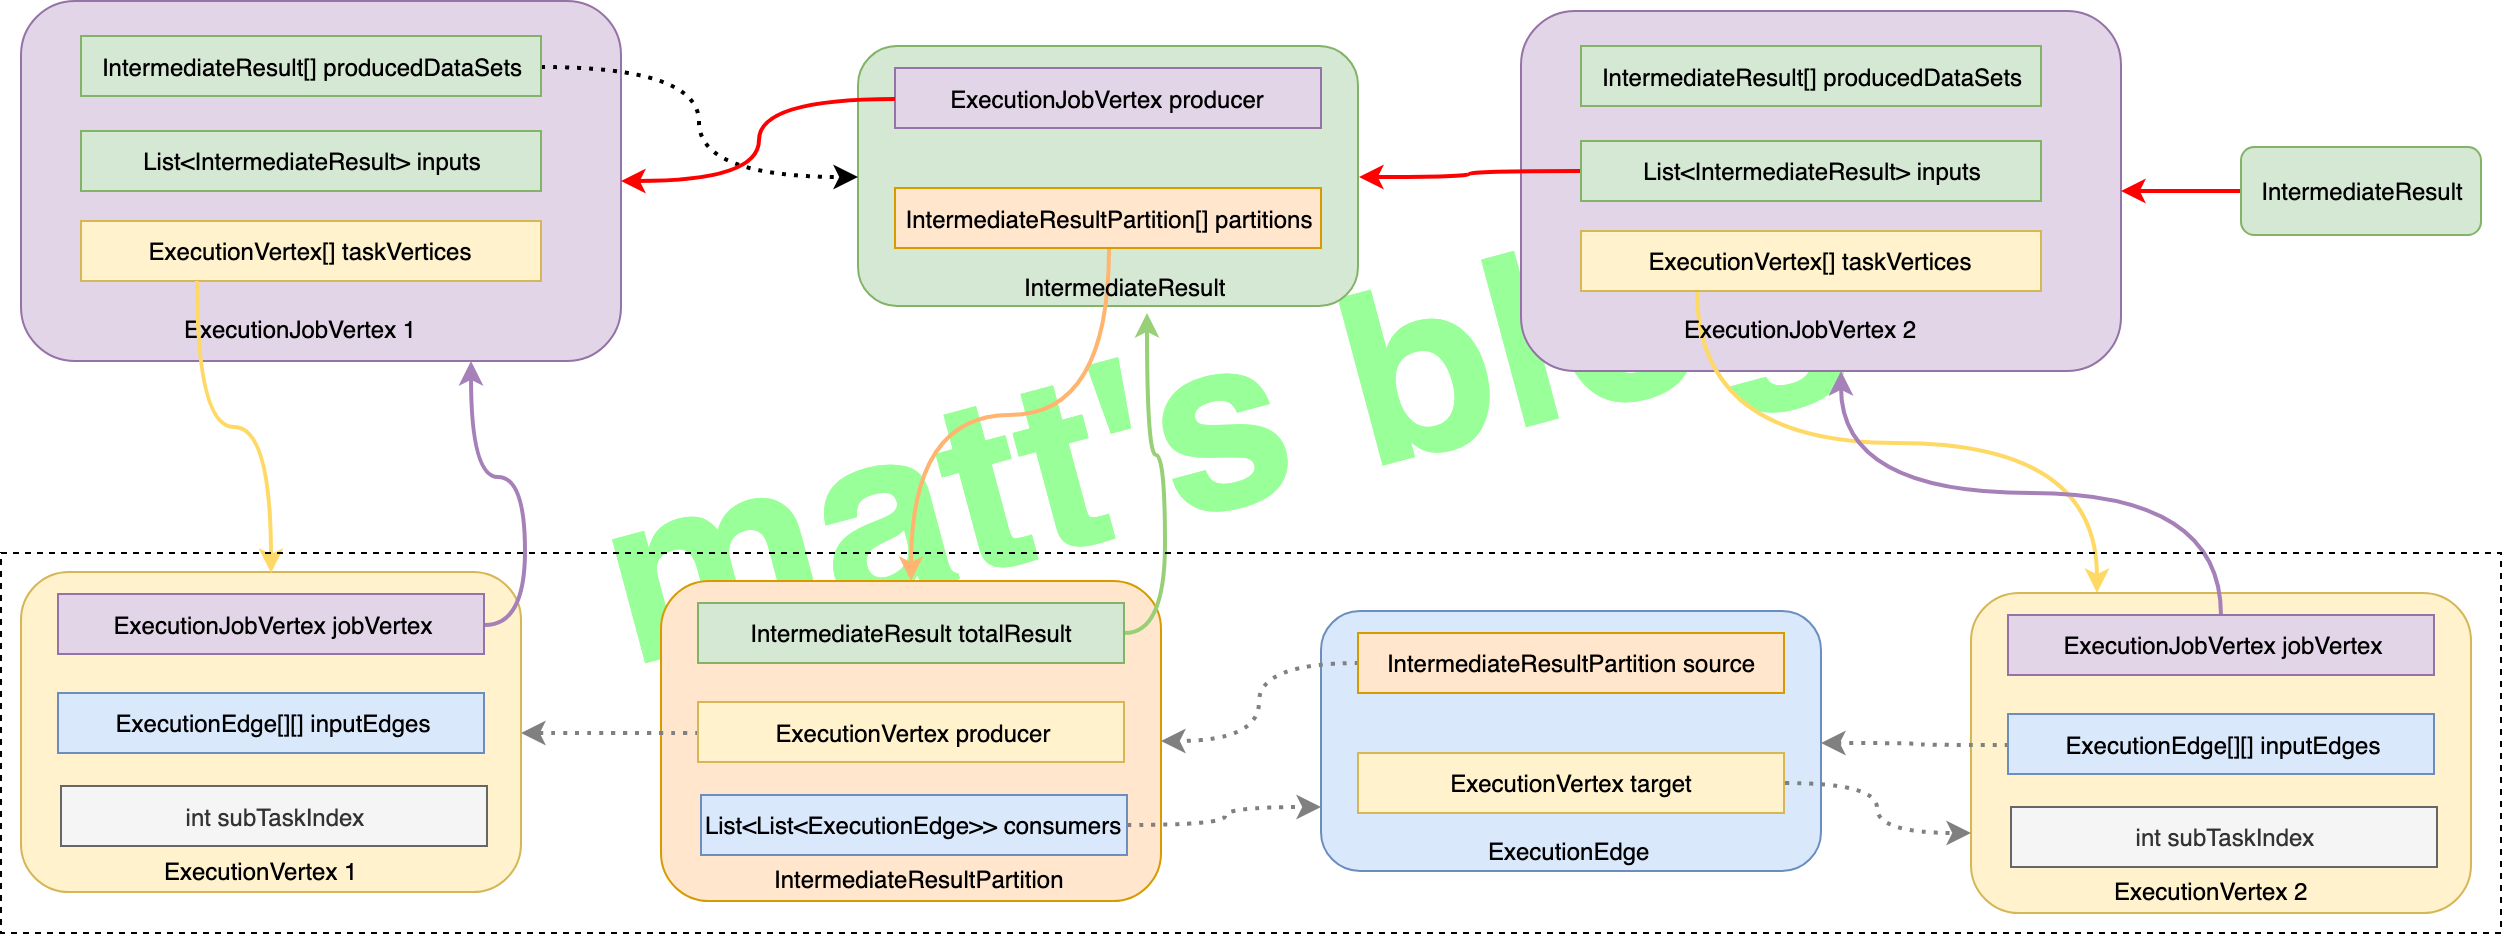
这里先放一张 ExecutionGraph 粗略图,它展示上面这些类之间的关系:

ExecutionGraph

实现细节

ExecutionGraph 的生成是在 ExecutionGraphBuilder 的 buildGraph() 方法中实现的:

1
2
3
4
5
6
7
8
9
10
11
12
13
14
15
16
17
18
19
20
21
22
23
24
25
26
27
28
29
30
31
32
33
34
35
36
37
38
39
40
41
42
43
44
45
46
47
48
49
50
51
52
53
54
55
56
57
58
59
60
61
62
63
64
65
66
67
68
69
70
71
72
73
74
75
76
77
78
79
80
81
82
83
84
85
86
87
88
89
90
91
92
93
94
95
96
97
98
99
100
101
102
103
104
105
106
107
108
109
110
111
112
113
114
115
116
117
118
119
120
121
122
123
124
125
126
127
128
129
130
131
132
133
134
135
136
137
138
139
140
141
142
143
144
145
146
147
148
149
150
151
152
153
154
155
156
157
158
159
160
161
162
163
164
165
166
167
168
169
170
171
172
173
174
175
176
177
178
179
180
181
182
183
184
185
186
187
188
189
190
191
192
193
194
195
196
197
198
199
200
201
202
203
204
205
206
207
208
209
210
211
212
213
214
215
216
217
218
219
220
221
222
223
224
225
226
227
228
229
230
231
232
233
234
235
236
237
238
239
240
241
242
243
244
245
246
247
248
249
250
251
252
// ExecutionGraphBuilder.java
public static ExecutionGraph buildGraph(
@Nullable ExecutionGraph prior,
JobGraph jobGraph,
Configuration jobManagerConfig,
ScheduledExecutorService futureExecutor,
Executor ioExecutor,
SlotProvider slotProvider,
ClassLoader classLoader,
CheckpointRecoveryFactory recoveryFactory,
Time rpcTimeout,
RestartStrategy restartStrategy,
MetricGroup metrics,
BlobWriter blobWriter,
Time allocationTimeout,
Logger log,
ShuffleMaster<?> shuffleMaster,
PartitionTracker partitionTracker,
FailoverStrategy.Factory failoverStrategyFactory) throws JobExecutionException, JobException {

checkNotNull(jobGraph, "job graph cannot be null");

final String jobName = jobGraph.getName();
final JobID jobId = jobGraph.getJobID();

//note: build jobInformation
final JobInformation jobInformation = new JobInformation(
jobId,
jobName,
jobGraph.getSerializedExecutionConfig(),
jobGraph.getJobConfiguration(),
jobGraph.getUserJarBlobKeys(),
jobGraph.getClasspaths());

//note: Execution 保留的最大历史数
final int maxPriorAttemptsHistoryLength =
jobManagerConfig.getInteger(JobManagerOptions.MAX_ATTEMPTS_HISTORY_SIZE);

//note: 决定什么时候释放 IntermediateResultPartitions 的策略
final PartitionReleaseStrategy.Factory partitionReleaseStrategyFactory =
PartitionReleaseStrategyFactoryLoader.loadPartitionReleaseStrategyFactory(jobManagerConfig);

// create a new execution graph, if none exists so far
//note: 如果 executionGraph 还不存在,就创建一个新的对象
final ExecutionGraph executionGraph;
try {
executionGraph = (prior != null) ? prior :
new ExecutionGraph(
jobInformation,
futureExecutor,
ioExecutor,
rpcTimeout,
restartStrategy,
maxPriorAttemptsHistoryLength,
failoverStrategyFactory,
slotProvider,
classLoader,
blobWriter,
allocationTimeout,
partitionReleaseStrategyFactory,
shuffleMaster,
partitionTracker,
jobGraph.getScheduleMode(),
jobGraph.getAllowQueuedScheduling());
} catch (IOException e) {
throw new JobException("Could not create the ExecutionGraph.", e);
}

// set the basic properties

try {
//note: 以 json 的形式记录 JobGraph
executionGraph.setJsonPlan(JsonPlanGenerator.generatePlan(jobGraph));
}
catch (Throwable t) {
log.warn("Cannot create JSON plan for job", t);
// give the graph an empty plan
executionGraph.setJsonPlan("{}");
}

// initialize the vertices that have a master initialization hook
// file output formats create directories here, input formats create splits

final long initMasterStart = System.nanoTime();
log.info("Running initialization on master for job {} ({}).", jobName, jobId);

for (JobVertex vertex : jobGraph.getVertices()) {
String executableClass = vertex.getInvokableClassName();
if (executableClass == null || executableClass.isEmpty()) {
throw new JobSubmissionException(jobId,
"The vertex " + vertex.getID() + " (" + vertex.getName() + ") has no invokable class.");
}

try {
//note: 对于 InputOutputFormatVertex 类型的对象,会在 master 节点做一些额外的初始化操作
vertex.initializeOnMaster(classLoader);
}
catch (Throwable t) {
throw new JobExecutionException(jobId,
"Cannot initialize task '" + vertex.getName() + "': " + t.getMessage(), t);
}
}

log.info("Successfully ran initialization on master in {} ms.",
(System.nanoTime() - initMasterStart) / 1_000_000);

// topologically sort the job vertices and attach the graph to the existing one
//note: 这里会先做一个排序,source 会放在最前面,接着开始遍历,必须保证当前添加到集合的节点的前置节点都已经添加进去了
List<JobVertex> sortedTopology = jobGraph.getVerticesSortedTopologicallyFromSources();
if (log.isDebugEnabled()) {
log.debug("Adding {} vertices from job graph {} ({}).", sortedTopology.size(), jobName, jobId);
}
//note: 处理的重点:生成具体的 Execution Plan
executionGraph.attachJobGraph(sortedTopology);

if (log.isDebugEnabled()) {
log.debug("Successfully created execution graph from job graph {} ({}).", jobName, jobId);
}

//note: cp 相关的配置
// configure the state CheckPointing
JobCheckpointingSettings snapshotSettings = jobGraph.getCheckpointingSettings();
if (snapshotSettings != null) {
//note: cp 时,需要 trigger(插入 barrier)的 JobVertex,这里指的是 source 节点
List<ExecutionJobVertex> triggerVertices =
idToVertex(snapshotSettings.getVerticesToTrigger(), executionGraph);

//note: cp 时,需要向 master 返回 ack 信息的 JobVertex 节点的集合
List<ExecutionJobVertex> ackVertices =
idToVertex(snapshotSettings.getVerticesToAcknowledge(), executionGraph);

List<ExecutionJobVertex> confirmVertices =
idToVertex(snapshotSettings.getVerticesToConfirm(), executionGraph);

CompletedCheckpointStore completedCheckpoints;
CheckpointIDCounter checkpointIdCounter;
try {
int maxNumberOfCheckpointsToRetain = jobManagerConfig.getInteger(
CheckpointingOptions.MAX_RETAINED_CHECKPOINTS);

if (maxNumberOfCheckpointsToRetain <= 0) {
// warning and use 1 as the default value if the setting in
// state.checkpoints.max-retained-checkpoints is not greater than 0.
log.warn("The setting for '{} : {}' is invalid. Using default value of {}",
CheckpointingOptions.MAX_RETAINED_CHECKPOINTS.key(),
maxNumberOfCheckpointsToRetain,
CheckpointingOptions.MAX_RETAINED_CHECKPOINTS.defaultValue());

maxNumberOfCheckpointsToRetain = CheckpointingOptions.MAX_RETAINED_CHECKPOINTS.defaultValue();
}

completedCheckpoints = recoveryFactory.createCheckpointStore(jobId, maxNumberOfCheckpointsToRetain, classLoader);
checkpointIdCounter = recoveryFactory.createCheckpointIDCounter(jobId);
}
catch (Exception e) {
throw new JobExecutionException(jobId, "Failed to initialize high-availability checkpoint handler", e);
}

// Maximum number of remembered checkpoints
//note: cp 保存的最多数量
int historySize = jobManagerConfig.getInteger(WebOptions.CHECKPOINTS_HISTORY_SIZE);

CheckpointStatsTracker checkpointStatsTracker = new CheckpointStatsTracker(
historySize,
ackVertices,
snapshotSettings.getCheckpointCoordinatorConfiguration(),
metrics);

// load the state backend from the application settings
final StateBackend applicationConfiguredBackend;
final SerializedValue<StateBackend> serializedAppConfigured = snapshotSettings.getDefaultStateBackend();

if (serializedAppConfigured == null) {
applicationConfiguredBackend = null;
}
else {
try {
applicationConfiguredBackend = serializedAppConfigured.deserializeValue(classLoader);
} catch (IOException | ClassNotFoundException e) {
throw new JobExecutionException(jobId,
"Could not deserialize application-defined state backend.", e);
}
}

//note: state backend
final StateBackend rootBackend;
try {
rootBackend = StateBackendLoader.fromApplicationOrConfigOrDefault(
applicationConfiguredBackend, jobManagerConfig, classLoader, log);
}
catch (IllegalConfigurationException | IOException | DynamicCodeLoadingException e) {
throw new JobExecutionException(jobId, "Could not instantiate configured state backend", e);
}

// instantiate the user-defined checkpoint hooks
//note: 实例话用户自定义的 cp hook
final SerializedValue<MasterTriggerRestoreHook.Factory[]> serializedHooks = snapshotSettings.getMasterHooks();
final List<MasterTriggerRestoreHook<?>> hooks;

if (serializedHooks == null) {
hooks = Collections.emptyList();
}
else {
final MasterTriggerRestoreHook.Factory[] hookFactories;
try {
hookFactories = serializedHooks.deserializeValue(classLoader);
}
catch (IOException | ClassNotFoundException e) {
throw new JobExecutionException(jobId, "Could not instantiate user-defined checkpoint hooks", e);
}

final Thread thread = Thread.currentThread();
final ClassLoader originalClassLoader = thread.getContextClassLoader();
thread.setContextClassLoader(classLoader);

try {
hooks = new ArrayList<>(hookFactories.length);
for (MasterTriggerRestoreHook.Factory factory : hookFactories) {
hooks.add(MasterHooks.wrapHook(factory.create(), classLoader));
}
}
finally {
thread.setContextClassLoader(originalClassLoader);
}
}

final CheckpointCoordinatorConfiguration chkConfig = snapshotSettings.getCheckpointCoordinatorConfiguration();

//note: 创建 CheckpointCoordinator 对象
executionGraph.enableCheckpointing(
chkConfig,
triggerVertices,
ackVertices,
confirmVertices,
hooks,
checkpointIdCounter,
completedCheckpoints,
rootBackend,
checkpointStatsTracker);
}

// create all the metrics for the Execution Graph

metrics.gauge(RestartTimeGauge.METRIC_NAME, new RestartTimeGauge(executionGraph));
metrics.gauge(DownTimeGauge.METRIC_NAME, new DownTimeGauge(executionGraph));
metrics.gauge(UpTimeGauge.METRIC_NAME, new UpTimeGauge(executionGraph));
metrics.gauge(NumberOfFullRestartsGauge.METRIC_NAME, new NumberOfFullRestartsGauge(executionGraph));

executionGraph.getFailoverStrategy().registerMetrics(metrics);

return executionGraph;
}

在这个方法里,会先创建一个 ExecutionGraph 对象,然后对 JobGraph 中的 JobVertex 列表做一下排序(先把有 source 节点的 JobVertex 放在最前面,然后开始遍历,只有当前 JobVertex 的前置节点都已经添加到集合后才能把当前 JobVertex 节点添加到集合中),最后通过 attachJobGraph() 方法生成具体的 Execution Plan。

ExecutionGraph 的 attachJobGraph() 方法会将这个作业的 ExecutionGraph 构建出来,它会根据 JobGraph 创建相应的 ExecutionJobVertex、IntermediateResult、ExecutionVertex、ExecutionEdge、IntermediateResultPartition,其详细的执行逻辑如下图所示:

ExecutionGraph

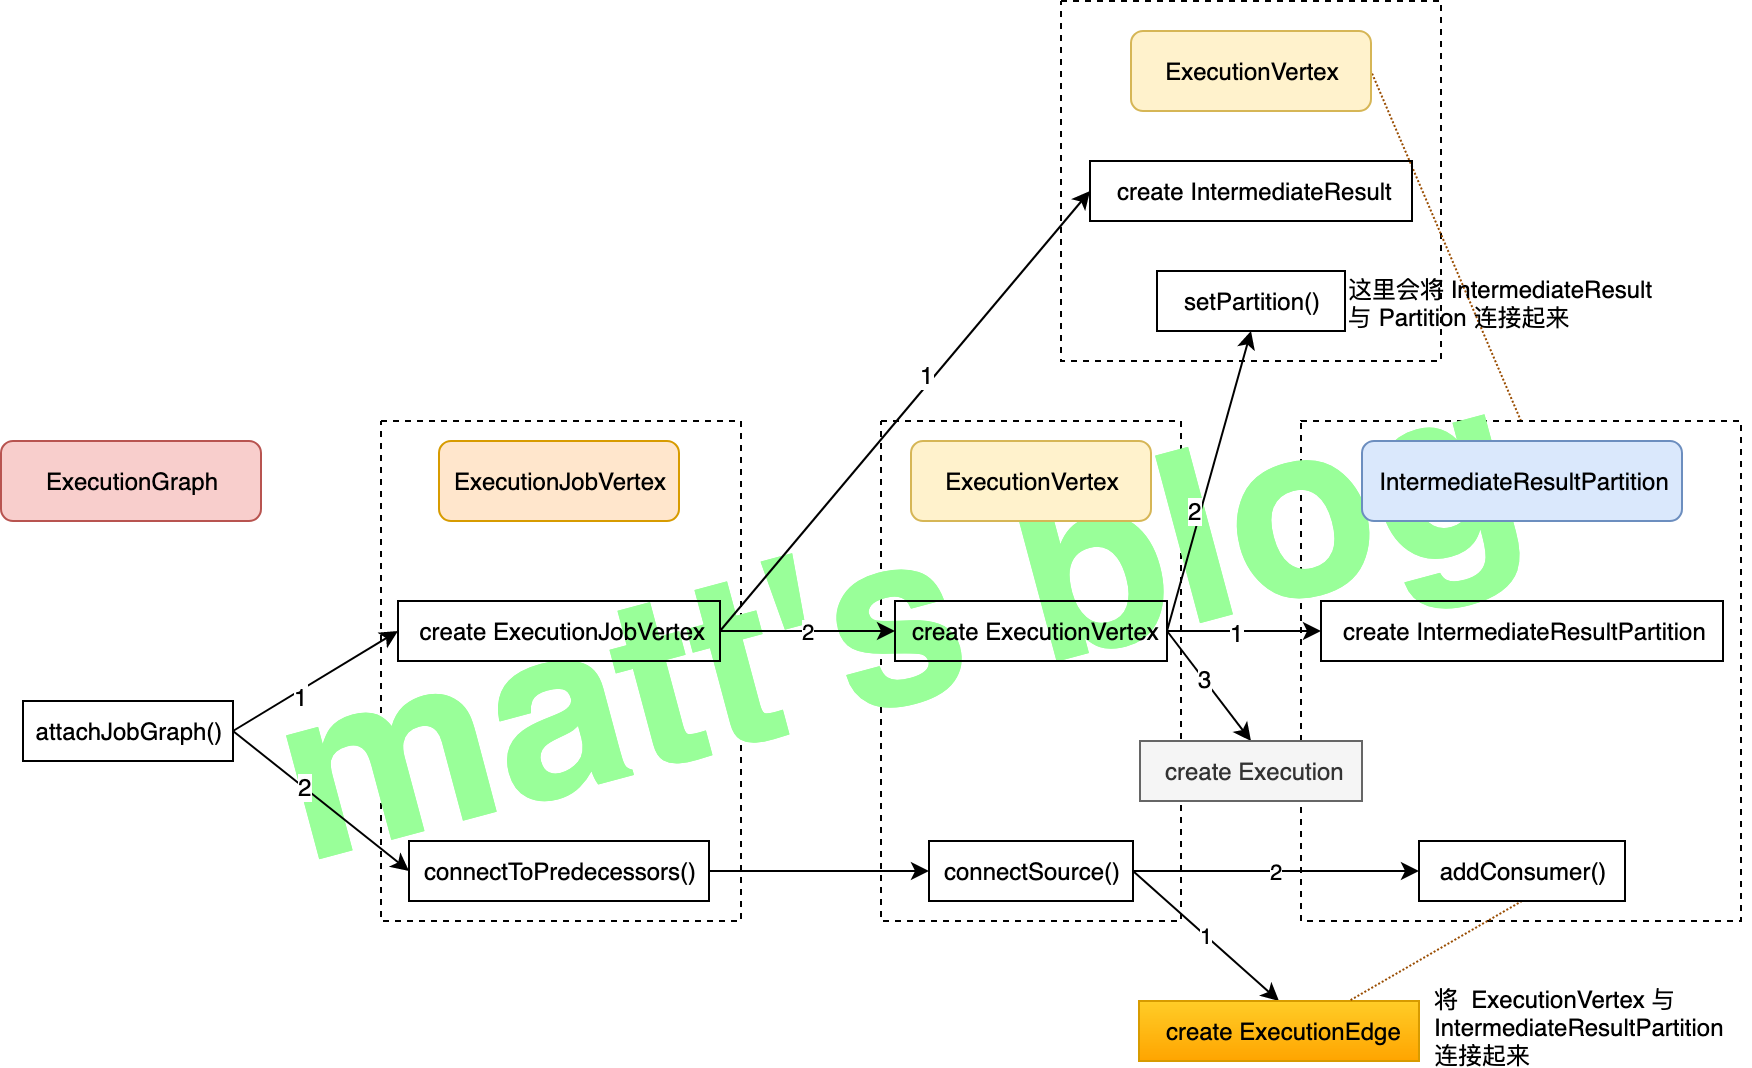
上面的图还是有些凌乱,要配合本文的第二张图来看,接下来看下具体的方法实现。

创建 ExecutionJobVertex 对象

先来看下创建 ExecutionJobVertex 对象的实现:

1
2
3
4
5
6
7
8
9
10
11
12
13
14
15
16
17
18
19
20
21
22
23
24
25
26
27
28
29
30
31
32
33
34
35
36
37
38
39
40
41
42
43
44
45
46
47
48
49
50
51
52
53
54
55
56
57
58
59
60
61
62
63
64
65
66
67
68
69
70
71
72
73
74
75
76
77
78
79
80
81
82
83
84
85
86
87
88
89
90
91
92
93
94
95
96
97
public ExecutionJobVertex(
ExecutionGraph graph,
JobVertex jobVertex,
int defaultParallelism,
int maxPriorAttemptsHistoryLength,
Time timeout,
long initialGlobalModVersion,
long createTimestamp) throws JobException {

if (graph == null || jobVertex == null) {
throw new NullPointerException();
}

this.graph = graph;
this.jobVertex = jobVertex;

//note: 并发度
int vertexParallelism = jobVertex.getParallelism();
int numTaskVertices = vertexParallelism > 0 ? vertexParallelism : defaultParallelism;

final int configuredMaxParallelism = jobVertex.getMaxParallelism();

this.maxParallelismConfigured = (VALUE_NOT_SET != configuredMaxParallelism);

// if no max parallelism was configured by the user, we calculate and set a default
setMaxParallelismInternal(maxParallelismConfigured ?
configuredMaxParallelism : KeyGroupRangeAssignment.computeDefaultMaxParallelism(numTaskVertices));

// verify that our parallelism is not higher than the maximum parallelism
if (numTaskVertices > maxParallelism) {
throw new JobException(
String.format("Vertex %s's parallelism (%s) is higher than the max parallelism (%s). Please lower the parallelism or increase the max parallelism.",
jobVertex.getName(),
numTaskVertices,
maxParallelism));
}

this.parallelism = numTaskVertices;
this.resourceProfile = ResourceProfile.fromResourceSpec(jobVertex.getMinResources(), 0);

//note: taskVertices 记录这个 task 每个并发
this.taskVertices = new ExecutionVertex[numTaskVertices];
this.operatorIDs = Collections.unmodifiableList(jobVertex.getOperatorIDs());
this.userDefinedOperatorIds = Collections.unmodifiableList(jobVertex.getUserDefinedOperatorIDs());

//note: 记录输入的 IntermediateResult 列表
this.inputs = new ArrayList<>(jobVertex.getInputs().size());

// take the sharing group
this.slotSharingGroup = jobVertex.getSlotSharingGroup();
this.coLocationGroup = jobVertex.getCoLocationGroup();

// setup the coLocation group
if (coLocationGroup != null && slotSharingGroup == null) {
throw new JobException("Vertex uses a co-location constraint without using slot sharing");
}

// create the intermediate results
//note: 创建 IntermediateResult 对象数组(根据 JobVertex 的 targets 来确定)
this.producedDataSets = new IntermediateResult[jobVertex.getNumberOfProducedIntermediateDataSets()];

for (int i = 0; i < jobVertex.getProducedDataSets().size(); i++) {
//note: JobGraph 中 IntermediateDataSet 这里会转换为 IntermediateResult 对象
final IntermediateDataSet result = jobVertex.getProducedDataSets().get(i);

//note: 这里一个 IntermediateDataSet 会对应一个 IntermediateResult
this.producedDataSets[i] = new IntermediateResult(
result.getId(),
this,
numTaskVertices,
result.getResultType());
}

// create all task vertices
//note: task vertices 创建
//note: 一个 JobVertex/ExecutionJobVertex 代表的是一个operator chain,而具体的 ExecutionVertex 则代表了每一个 Task
for (int i = 0; i < numTaskVertices; i++) {
ExecutionVertex vertex = new ExecutionVertex(
this,
i,
producedDataSets,
timeout,
initialGlobalModVersion,
createTimestamp,
maxPriorAttemptsHistoryLength);

this.taskVertices[i] = vertex;
}

// sanity check for the double referencing between intermediate result partitions and execution vertices
for (IntermediateResult ir : this.producedDataSets) {
if (ir.getNumberOfAssignedPartitions() != parallelism) {
throw new RuntimeException("The intermediate result's partitions were not correctly assigned.");
}
}
// ...
}

它主要做了一下工作:

  1. 根据这个 JobVertex 的 resultsIntermediateDataSet 列表)来创建相应的 IntermediateResult 对象,每个 IntermediateDataSet 都会对应的一个 IntermediateResult
  2. 再根据这个 JobVertex 的并发度,来创建相同数量的 ExecutionVertex 对象,每个 ExecutionVertex 对象在调度时实际上就是一个 task 任务;
  3. 在创建 IntermediateResultExecutionVertex 对象时都会记录它们之间的关系,它们之间的关系可以参考本文的图二。

创建 ExecutionVertex 对象

创建 ExecutionVertex 对象的实现如下:

1
2
3
4
5
6
7
8
9
10
11
12
13
14
15
16
17
18
19
20
21
22
23
24
25
26
27
28
29
30
31
32
33
34
35
36
37
38
39
40
41
42
43
44
45
46
47
48
49
50
51
52
53
54
public ExecutionVertex(
ExecutionJobVertex jobVertex,
int subTaskIndex,
IntermediateResult[] producedDataSets,
Time timeout,
long initialGlobalModVersion,
long createTimestamp,
int maxPriorExecutionHistoryLength) {

this.jobVertex = jobVertex;
this.subTaskIndex = subTaskIndex;
this.executionVertexId = new ExecutionVertexID(jobVertex.getJobVertexId(), subTaskIndex);
this.taskNameWithSubtask = String.format("%s (%d/%d)",
jobVertex.getJobVertex().getName(), subTaskIndex + 1, jobVertex.getParallelism());

this.resultPartitions = new LinkedHashMap<>(producedDataSets.length, 1);

//note: 新建 IntermediateResultPartition 对象,并更新到缓存中
for (IntermediateResult result : producedDataSets) {
IntermediateResultPartition irp = new IntermediateResultPartition(result, this, subTaskIndex);
//note: 记录 IntermediateResult 与 IntermediateResultPartition 之间的关系
result.setPartition(subTaskIndex, irp);

resultPartitions.put(irp.getPartitionId(), irp);
}

//note: 创建 input ExecutionEdge 列表,记录输入的 ExecutionEdge 列表
this.inputEdges = new ExecutionEdge[jobVertex.getJobVertex().getInputs().size()][];

this.priorExecutions = new EvictingBoundedList<>(maxPriorExecutionHistoryLength);

//note: 创建对应的 Execution 对象,初始化时 attemptNumber 为 0,如果后面重新调度这个 task,它会自增加 1
this.currentExecution = new Execution(
getExecutionGraph().getFutureExecutor(),
this,
0,
initialGlobalModVersion,
createTimestamp,
timeout);

// create a co-location scheduling hint, if necessary
CoLocationGroup clg = jobVertex.getCoLocationGroup();
if (clg != null) {
this.locationConstraint = clg.getLocationConstraint(subTaskIndex);
}
else {
this.locationConstraint = null;
}

getExecutionGraph().registerExecution(currentExecution);

this.timeout = timeout;
this.inputSplits = new ArrayList<>();
}

ExecutionVertex 创建时,主要做了下面这三件事:

  1. 根据这个 ExecutionJobVertex 的 producedDataSets(IntermediateResult 类型的数组),给每个 ExecutionVertex 创建相应的 IntermediateResultPartition 对象,它代表了一个 IntermediateResult 分区;
  2. 调用 IntermediateResult 的 setPartition() 方法,记录 IntermediateResult 与 IntermediateResultPartition 之间的关系;
  3. 给这个 ExecutionVertex 创建一个 Execution 对象,如果这个 ExecutionVertex 重新调度(失败重新恢复等情况),那么 Execution 对应的 attemptNumber 将会自增加 1,这里初始化的时候其值为 0。

创建 ExecutionEdge

根据前面的流程图,接下来,看下 ExecutionJobVertex 的 connectToPredecessors() 方法。在这个方法中,主要做的工作是创建对应的 ExecutionEdge 对象,并使用这个对象将 ExecutionVertex 与 IntermediateResultPartition 连接起来,ExecutionEdge 的成员变量比较简单,如下所示:

1
2
3
4
5
6
7
8
9
// ExecutionEdge.java
public class ExecutionEdge {
// source 节点
private final IntermediateResultPartition source;
// target 节点
private final ExecutionVertex target;

private final int inputNum;
}

ExecutionEdge 的创建是在 ExecutionVertex 中 connectSource() 方法中实现的,代码实现如下:

1
2
3
4
5
6
7
8
9
10
11
12
13
14
15
16
17
18
19
20
21
22
23
24
25
26
27
28
29
30
31
32
33
34
35
// ExecutionVertex.java
//note: 与上游节点连在一起
public void connectSource(int inputNumber, IntermediateResult source, JobEdge edge, int consumerNumber) {

final DistributionPattern pattern = edge.getDistributionPattern();
final IntermediateResultPartition[] sourcePartitions = source.getPartitions();

ExecutionEdge[] edges;

//note: 只有 forward/RESCALE 的方式的情况下,pattern 才是 POINTWISE 的,否则均为 ALL_TO_ALL
switch (pattern) {
case POINTWISE:
edges = connectPointwise(sourcePartitions, inputNumber);
break;

case ALL_TO_ALL:
//note: 它会连接上游所有的 IntermediateResultPartition
edges = connectAllToAll(sourcePartitions, inputNumber);
break;

default:
throw new RuntimeException("Unrecognized distribution pattern.");

}

inputEdges[inputNumber] = edges;

// add the consumers to the source
// for now (until the receiver initiated handshake is in place), we need to register the
// edges as the execution graph
//note: 之前已经为 IntermediateResult 添加了 consumer,这里为 IntermediateResultPartition 添加 consumer,即关联到 ExecutionEdge 上
for (ExecutionEdge ee : edges) {
ee.getSource().addConsumer(ee, consumerNumber);
}
}

在创建 ExecutionEdge 时,会根据这个 JobEdge 的 DistributionPattern 选择不同的实现,这里主要分两种情况,DistributionPattern 是跟 Partitioner 的配置有关(Partitioner 详解):

1
2
3
4
5
6
7
8
9
10
11
12
13
14
// StreamingJobGraphGenerator.java
//note: 创建 JobEdge(它会连接上下游的 node)
JobEdge jobEdge;
if (partitioner instanceof ForwardPartitioner || partitioner instanceof RescalePartitioner) {
jobEdge = downStreamVertex.connectNewDataSetAsInput( //note: 这个方法会创建 IntermediateDataSet 对象
headVertex,
DistributionPattern.POINTWISE, //note: 上游与下游的消费模式,(每个生产任务的 sub-task 会连接到消费任务的一个或多个 sub-task)
resultPartitionType);
} else {
jobEdge = downStreamVertex.connectNewDataSetAsInput(
headVertex,
DistributionPattern.ALL_TO_ALL, //note: 每个生产任务的 sub-task 都会连接到每个消费任务的 sub-task
resultPartitionType);
}

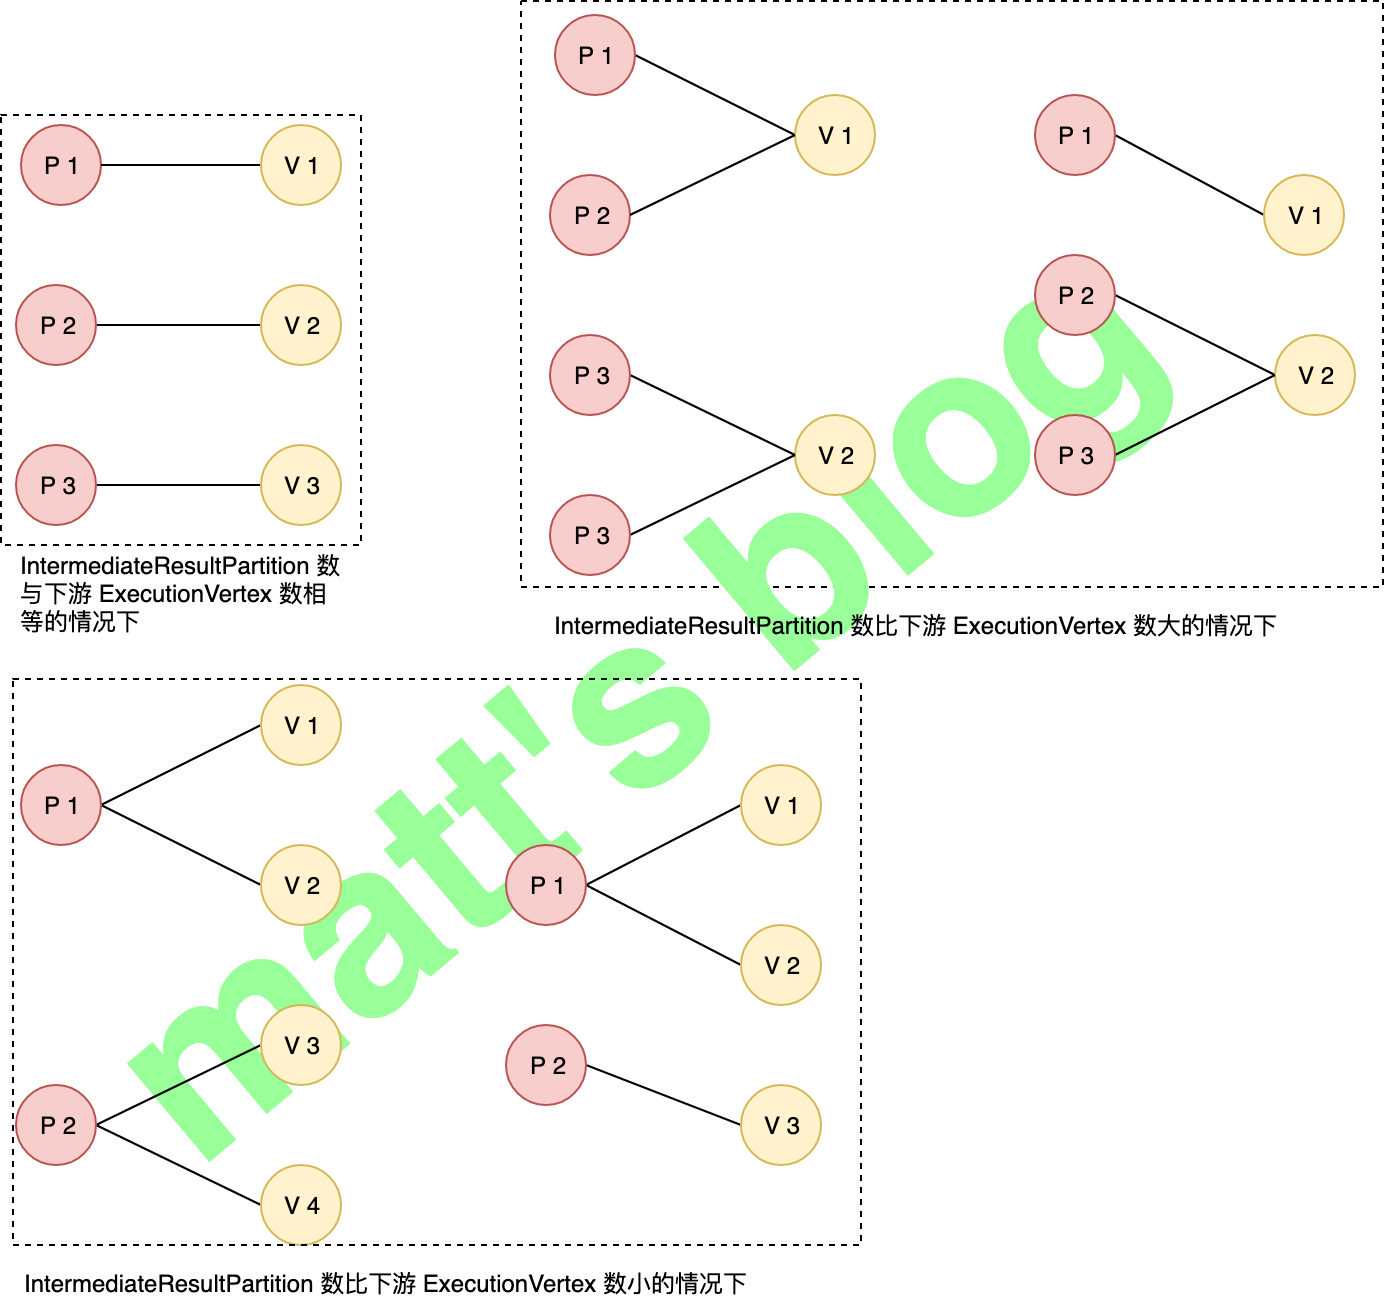
如果 DistributionPattern 是 ALL_TO_ALL 模式,这个 ExecutionVertex 会与 IntermediateResult 对应的所有 IntermediateResultPartition 连接起来,而如果是 POINTWISE 模式,ExecutionVertex 只会与部分的 IntermediateResultPartition 连接起来。POINTWISE 模式下 IntermediateResultPartition 与 ExecutionVertex 之间的分配关系如下图所示,具体的分配机制是跟 IntermediateResultPartition 数与 ExecutionVertex 数有很大关系的,具体细节实现可以看下相应代码,这里只是举了几个示例。

POINTWISE 模式下的分配机制

到这里,这个作业的 ExecutionGraph 就创建完成了,有了 ExecutionGraph,JobManager 才能对这个作业做相应的调度。

总结

本文详细介绍了 JobGraph 如何转换为 ExecutionGraph 的过程。到这里,StreamGraph、 JobGraph 和 ExecutionGraph 的生成过程,在最近的三篇文章中已经详细讲述完了,后面将会给大家逐步介绍 runtime 的其他内容。

简单总结一下:

  1. streamGraph 是最原始的用户逻辑,是一个没有做任何优化的 DataFlow;
  2. JobGraph 对 StreamGraph 做了一些优化,主要是将能够 Chain 在一起的算子 Chain 在一起,这一样可以减少网络 shuffle 的开销;
  3. ExecutionGraph 则是作业运行是用来调度的执行图,可以看作是并行化版本的 JobGraph,将 DAG 拆分到基本的调度单元。

参考