本篇文章是 Flink 系列 的第三篇,紧接着上一篇文章,本文主要讲述 StreamGraph 是如何转换成 JobGraph 的,在前面的文章中,我们知道 StreamGraph 是根据用户作业的处理逻生成初始的逻辑计划,它并没有做任何的优化,而 JobGraph 将会在原来的基础上做相应的优化(主要是算子的 Chain 操作,Chain 在一起的算子将会在同一个 task 上运行,会极大减少 shuffle 的开销)。刚开始接触的同学可能会有一个疑问,为什么要有 StreamGraph 和 JobGraph 两层的 Graph,这里最主要的原因是为兼容 batch process,Streaming process 最初产生的是 StreamGraph,而 batch process 产生的则是 OptimizedPlan,但是它们最后都会转换为 JobGraph,本文主要是以 Streaming 作业的 StreamGraph 转换为 JobGraph 的处理流程来介绍。
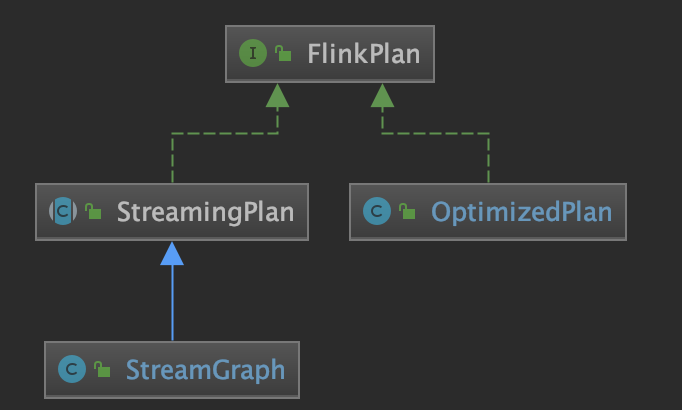
生成 JobGraph 的整体流程 这里我们先看下 FlinkPlan 的实现,它主要有两个实现类:StreamGraph 和 OptimizedPlan,分别对应 Streaming 和 Batch process,不管是哪种类型最后可以转换为 JobGraph:
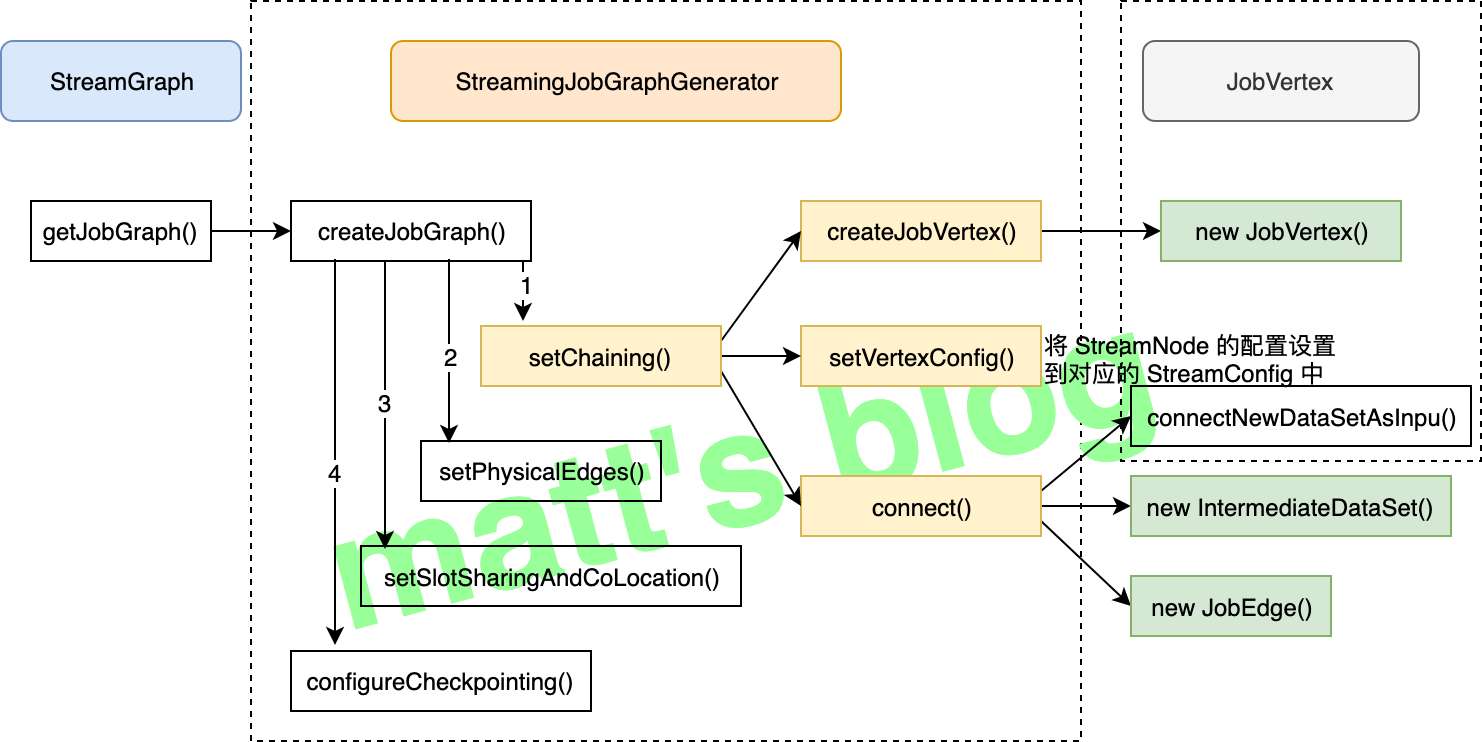
OptimizedPlan 可以通过 JobGraphGenerator 的 compileJobGraph() 方法来转换为 JobGraph,而 StreamGraph 则可以通过 StreamingJobGraphGenerator 的 createJobGraph() 方法来转换为相应的 JobGraph。其中,StreamGraph 的整体转换流程如下图所示(下图主要展示了这个流程涉及到主要方法调用,比较核心的方法图中也加了颜色,也是本文会着重讲述的方法):
具体实现流程 StreamingJobGraphGenerator 的 createJobGraph() 的方法实现如下:
1 2 3 4 5 6 7 8 9 10 11 12 13 14 15 16 17 18 19 20 21 22 23 24 25 26 27 28 29 30 31 32 33 34 35 36 37 38 39 40 41 42 43 44 45 46 47 48 49 50 51 52 53 private JobGraph createJobGraph () jobGraph.setScheduleMode(streamGraph.getScheduleMode()); Map<Integer, byte []> hashes = defaultStreamGraphHasher.traverseStreamGraphAndGenerateHashes(streamGraph); List<Map<Integer, byte []>> legacyHashes = new ArrayList<>(legacyStreamGraphHashers.size()); for (StreamGraphHasher hasher : legacyStreamGraphHashers) { legacyHashes.add(hasher.traverseStreamGraphAndGenerateHashes(streamGraph)); } Map<Integer, List<Tuple2<byte [], byte []>>> chainedOperatorHashes = new HashMap<>(); setChaining(hashes, legacyHashes, chainedOperatorHashes); setPhysicalEdges(); setSlotSharingAndCoLocation(); configureCheckpointing(); JobGraphGenerator.addUserArtifactEntries(streamGraph.getUserArtifacts(), jobGraph); try { jobGraph.setExecutionConfig(streamGraph.getExecutionConfig()); } catch (IOException e) { throw new IllegalConfigurationException("Could not serialize the ExecutionConfig." + "This indicates that non-serializable types (like custom serializers) were registered" ); } return jobGraph; }
核心步骤如下:
先给每个 StreamNode 生成一个唯一确定的 hash id;
setChaining() 方法将可以 Chain 到一起的 StreamNode Chain 在一起,这里会生成相应的 JobVertex 、JobEdge 、 IntermediateDataSet 对象,JobGraph 的 Graph 在这一步就已经完全构建出来了;setPhysicalEdges() 方法会将每个 JobVertex 的入边集合也序列化到该 JobVertex 的 StreamConfig 中 (出边集合已经在 setChaining 的时候写入了);setSlotSharingAndCoLocation() 方法主要是 JobVertex 的 SlotSharingGroup 和 CoLocationGroup 设置;configureCheckpointing() 方法主要是 checkpoint 相关的设置。
基本概念 JobGraph 又引入了几个概念,这里先简单介绍一下。
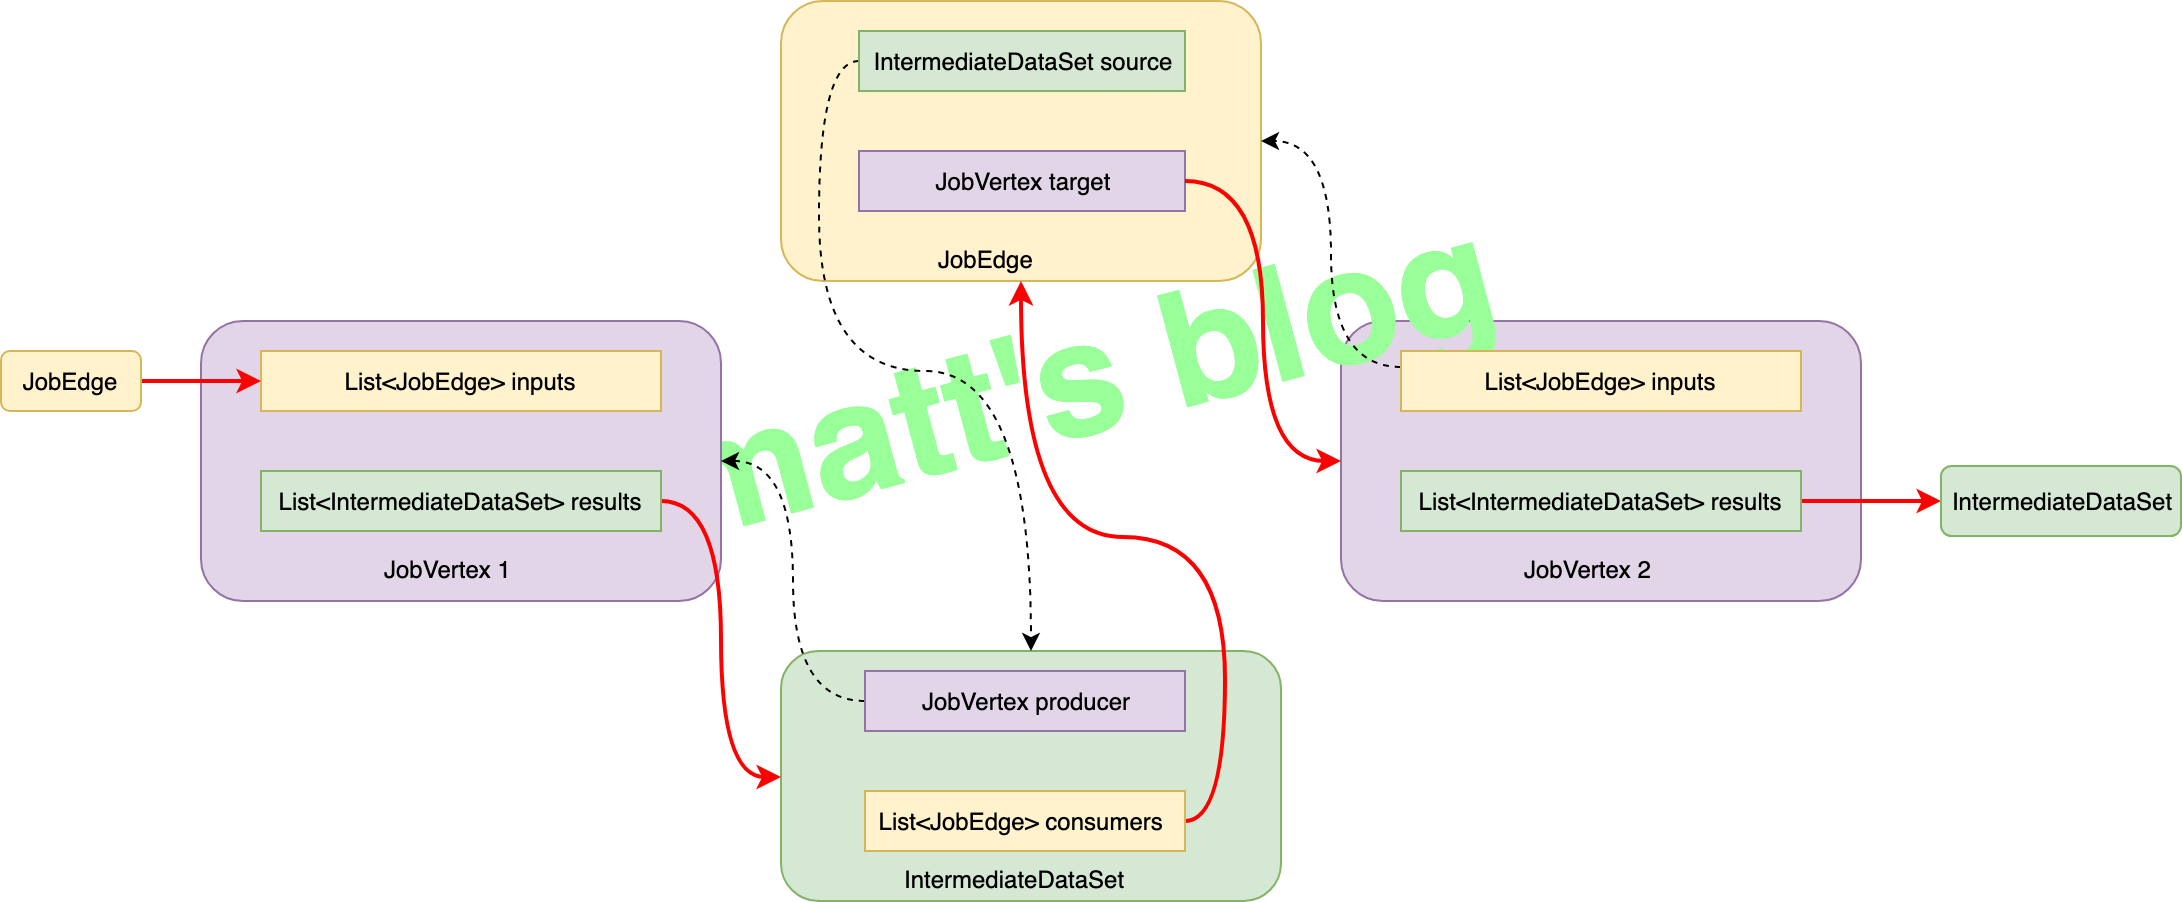
StreamConfig : 它会记录一个 StreamOperator 的配置信息,它保存了这个 StreamOperator 的基本信息,在这里它会将 StreamGraph 中的 StreamNode 的详细信息同步到它对应的 StreamConfig 对象中;JobVertex : JobVertex 相当于是 JobGraph 的顶点,跟 StreamNode 的区别是,它是 Operator Chain 之后的顶点,会包含多个 StreamNode;IntermediateDataSet : 它是由一个 Operator(可能是 source,也可能是某个中间算子)产生的一个中间数据集;JobEdge : 它相当于是 JobGraph 中的边(连接通道),这个边连接的是一个 IntermediateDataSet 跟一个要消费的 JobVertex。
如果跟前面的 StreamGraph 做对比,JobGraph 这里不但会对算子做 Chain 操作,还多抽象了一个概念 —— IntermediateDataSet,IntermediateDataSet 的抽象主要是为了后面 ExecutionGraph 的生成。
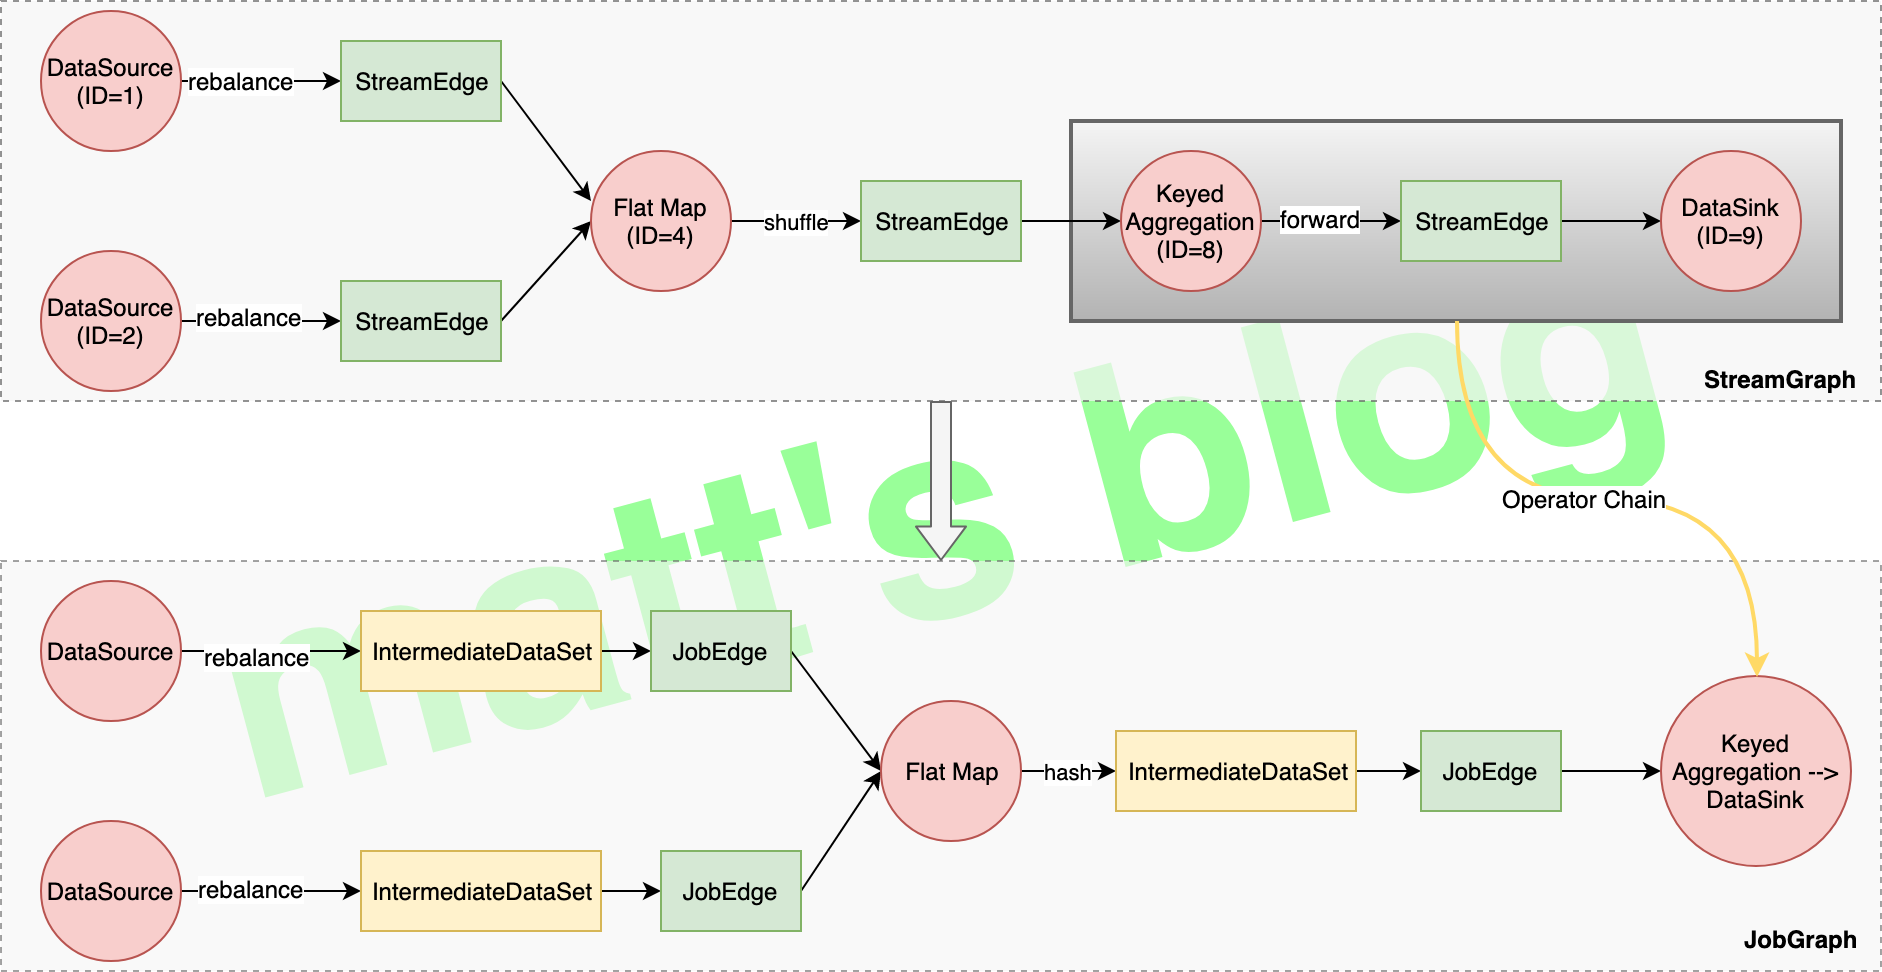
算子是如何 Chain 到一起的 这里,我们来介绍一下生成的 JobGraph 过程中最核心一步,算子如何 Chain 到一起,先看一下示例,示例与前面两篇文章的示例是一样的(这里因为图片大小限制,去掉了 filter 算子),StreamGraph 及转换后的 JobGraph 如何下图所示:
StreamGraph 转换为 JobGraph 的处理过程主要是在 setChaining() 中完成,先看下这个方法的实现:
1 2 3 4 5 6 7 8 9 10 11 12 13 14 15 16 17 18 19 20 21 22 23 24 25 26 27 28 29 30 31 32 33 34 35 36 37 38 39 40 41 42 43 44 45 46 47 48 49 50 51 52 53 54 55 56 57 58 59 60 61 62 63 64 65 66 67 68 69 70 71 72 73 74 75 76 77 78 79 80 81 82 83 84 85 86 87 88 89 90 91 92 93 94 95 96 97 98 99 100 101 102 103 104 105 106 107 108 109 110 111 112 113 114 115 116 117 118 119 120 121 122 123 124 125 126 127 128 129 130 131 132 133 private void setChaining (Map<Integer, byte []> hashes, List<Map<Integer, byte []>> legacyHashes, Map<Integer, List<Tuple2<byte [], byte []>>> chainedOperatorHashes) for (Integer sourceNodeId : streamGraph.getSourceIDs()) { createChain(sourceNodeId, sourceNodeId, hashes, legacyHashes, 0 , chainedOperatorHashes); } } private List<StreamEdge> createChain ( Integer startNodeId, Integer currentNodeId, Map<Integer, byte []> hashes, List<Map<Integer, byte []>> legacyHashes, int chainIndex, Map<Integer, List<Tuple2<byte [], byte []>>> chainedOperatorHashes) if (!builtVertices.contains(startNodeId)) { List<StreamEdge> transitiveOutEdges = new ArrayList<StreamEdge>(); List<StreamEdge> chainableOutputs = new ArrayList<StreamEdge>(); List<StreamEdge> nonChainableOutputs = new ArrayList<StreamEdge>(); StreamNode currentNode = streamGraph.getStreamNode(currentNodeId); for (StreamEdge outEdge : currentNode.getOutEdges()) { if (isChainable(outEdge, streamGraph)) { chainableOutputs.add(outEdge); } else { nonChainableOutputs.add(outEdge); } } for (StreamEdge chainable : chainableOutputs) { transitiveOutEdges.addAll( createChain(startNodeId, chainable.getTargetId(), hashes, legacyHashes, chainIndex + 1 , chainedOperatorHashes)); } for (StreamEdge nonChainable : nonChainableOutputs) { transitiveOutEdges.add(nonChainable); createChain(nonChainable.getTargetId(), nonChainable.getTargetId(), hashes, legacyHashes, 0 , chainedOperatorHashes); } List<Tuple2<byte [], byte []>> operatorHashes = chainedOperatorHashes.computeIfAbsent(startNodeId, k -> new ArrayList<>()); byte [] primaryHashBytes = hashes.get(currentNodeId); OperatorID currentOperatorId = new OperatorID(primaryHashBytes); for (Map<Integer, byte []> legacyHash : legacyHashes) { operatorHashes.add(new Tuple2<>(primaryHashBytes, legacyHash.get(currentNodeId))); } chainedNames.put(currentNodeId, createChainedName(currentNodeId, chainableOutputs)); chainedMinResources.put(currentNodeId, createChainedMinResources(currentNodeId, chainableOutputs)); chainedPreferredResources.put(currentNodeId, createChainedPreferredResources(currentNodeId, chainableOutputs)); if (currentNode.getInputFormat() != null ) { getOrCreateFormatContainer(startNodeId).addInputFormat(currentOperatorId, currentNode.getInputFormat()); } if (currentNode.getOutputFormat() != null ) { getOrCreateFormatContainer(startNodeId).addOutputFormat(currentOperatorId, currentNode.getOutputFormat()); } StreamConfig config = currentNodeId.equals(startNodeId) ? createJobVertex(startNodeId, hashes, legacyHashes, chainedOperatorHashes) : new StreamConfig(new Configuration()); setVertexConfig(currentNodeId, config, chainableOutputs, nonChainableOutputs); if (currentNodeId.equals(startNodeId)) { config.setChainStart(); config.setChainIndex(0 ); config.setOperatorName(streamGraph.getStreamNode(currentNodeId).getOperatorName()); config.setOutEdgesInOrder(transitiveOutEdges); config.setOutEdges(streamGraph.getStreamNode(currentNodeId).getOutEdges()); for (StreamEdge edge : transitiveOutEdges) { connect(startNodeId, edge); } config.setTransitiveChainedTaskConfigs(chainedConfigs.get(startNodeId)); } else { chainedConfigs.computeIfAbsent(startNodeId, k -> new HashMap<Integer, StreamConfig>()); config.setChainIndex(chainIndex); StreamNode node = streamGraph.getStreamNode(currentNodeId); config.setOperatorName(node.getOperatorName()); chainedConfigs.get(startNodeId).put(currentNodeId, config); } config.setOperatorID(currentOperatorId); if (chainableOutputs.isEmpty()) { config.setChainEnd(); } return transitiveOutEdges; } else { return new ArrayList<>(); } }
这段代码处理完成后,整个 JobGraph 就构建完成了,它首先从会遍历这个 StreamGraph 的 source 节点,然后选择从 source 节点开始执行 createChain() 方法,在具体的实现里,主要逻辑如下(需要配合前面的代码去看,这里会把多个 StreamNode Chain 在一起的 Node 叫做 ChainNode,方便讲述):
createChain() 当前要处理的节点是 currentNodeId,先从 StreamGraph 中拿到这个 StreamNode 的 outEdge(currentNode.getOutEdges()),然后判断这个 outEdge 连接的两个 StreamNode 是否可以 Chain 在一起,判断方法是 isChainable();紧接着会有一个递归调用:
对于可以 Chain 在一起的 StreamEdge(这个 Edge 连接两个 StreamNode 是可以 Chain 在一起),会再次调用 createChain() 方法,并且 createChain() 中的 startNodeId 还是最开始的 startNodeId(这个标识了这个 ChainNode 的开始 NodeId),而 chainIndex 会自增加 1;
而对于不能 Chain 在一起的 StreamEdge,createChain() 中的 startNodeId 变成了这个 StreamEdge 的 target StreamNode(相当于如果 Chain 在一起,ChainNode 中的 startNodeId 会赋值为下一个节点的 NodeId,然后再依次类推),chainIndex 又从 0 开始计;
也就是说:createChain() 中的 startNodeId 表示了当前可以 Chain 之后 Node 的 startId,这里,会一直递归调用,直到达到 Sink 节点。
然后在生成 StreamConfig 对象时,判断当前的 currentNodeId 与 startNodeId 是否相等,如果相等的话,证明当前 Node 就是这个 ChainNode 的 StartNode,这里会调用 createJobVertex() 方法给这个 ChainNode 创建一个 JobVertex 对象,最后会返回一个 StreamConfig 对象,如果前面的 id 不相等的话,这里会直接返回一个 StreamConfig 对象(这个对象主要是记录当前 StreamNode 的一些配置,它会同步 StreamGraph 中相关的配置);
最后还会分两种情况判断:
如果 id 相等,相当于这个 ChainNode 已经完成,先做一些相关的配置(比如:标识当前 StreamNode 为这个 JobVertex 的起始 node),最后再通过 connect() 方法创建 JobEdge 和 IntermediateDataSet 对象,把这个 Graph 连接起来;
如果 id 不相等,那么证明当前 StreamNode 只是这个 ChainNode 的一部分,这里只是同步一下信息,并记录到缓存。
上面就是这个方法的主要实现逻辑,下面会详细把这个方法展开,重点介绍其中的一些方法实现。
如何判断算子是否可以 Chain 在一起 两个 StreamNode 是否可以 Chain 到一起,是通过 isChainable() 方法来判断的,这里判断的粒度是 StreamEdge,实际上就是判断 StreamEdge 连接的两个 StreamNode 是否 Chain 在一起:
1 2 3 4 5 6 7 8 9 10 11 12 13 14 15 16 17 18 19 20 21 public static boolean isChainable (StreamEdge edge, StreamGraph streamGraph) StreamNode upStreamVertex = streamGraph.getSourceVertex(edge); StreamNode downStreamVertex = streamGraph.getTargetVertex(edge); StreamOperatorFactory<?> headOperator = upStreamVertex.getOperatorFactory(); StreamOperatorFactory<?> outOperator = downStreamVertex.getOperatorFactory(); return downStreamVertex.getInEdges().size() == 1 && outOperator != null && headOperator != null && upStreamVertex.isSameSlotSharingGroup(downStreamVertex) && outOperator.getChainingStrategy() == ChainingStrategy.ALWAYS && (headOperator.getChainingStrategy() == ChainingStrategy.HEAD || headOperator.getChainingStrategy() == ChainingStrategy.ALWAYS) && (edge.getPartitioner() instanceof ForwardPartitioner) && edge.getShuffleMode() != ShuffleMode.BATCH && upStreamVertex.getParallelism() == downStreamVertex.getParallelism() && streamGraph.isChainingEnabled(); }
这个方法判断的指标有很多,具体看上面代码就可以明白,这里着重介绍两个:slotSharingGroup 和 edge.getPartitioner()。
slotSharingGroup 先看下一个 StreamNode 的 slotSharingGroup 是如何生成的:
1 2 3 4 5 6 7 8 9 10 11 12 13 14 15 16 17 18 19 20 21 22 23 24 25 26 27 28 29 30 31 32 33 34 35 36 37 38 39 public static final String DEFAULT_SLOT_SHARING_GROUP = "default" ;private String determineSlotSharingGroup (String specifiedGroup, Collection<Integer> inputIds) if (!isSlotSharingEnabled) { return null ; } if (specifiedGroup != null ) { return specifiedGroup; } else { String inputGroup = null ; for (int id: inputIds) { String inputGroupCandidate = streamGraph.getSlotSharingGroup(id); if (inputGroup == null ) { inputGroup = inputGroupCandidate; } else if (!inputGroup.equals(inputGroupCandidate)) { return DEFAULT_SLOT_SHARING_GROUP; } } return inputGroup == null ? DEFAULT_SLOT_SHARING_GROUP : inputGroup; } }
一个 StreamNode 的 SlotSharingGroup 会按照下面这个逻辑来确定:
如果用户指定了 SlotSharingGroup,直接使用这个 SlotSharingGroup name;
如果所有的 input 都是同一个 group name,使用这个即可;
否则使用 default group;
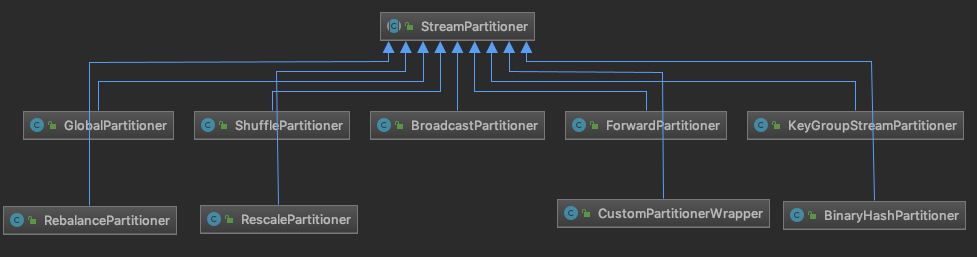
Partitioner 这个 StreamEdge 的属性,在创建 StreamEdge 对象会配置这个属性,先看 Flink 中提供的 Partitioner 有哪几种:
用户可以在自己的代码中调用 DataStream API (比如:broadcast()、shuffle() 等)配置相应的 StreamPartitioner,如果这个没有指定 StreamPartitioner 的话,则会走下面的逻辑创建默认的 StreamPartitioner:
1 2 3 4 5 6 7 if (partitioner == null && upstreamNode.getParallelism() == downstreamNode.getParallelism()) { partitioner = new ForwardPartitioner<Object>(); } else if (partitioner == null ) { partitioner = new RebalancePartitioner<Object>(); }
创建 JobVertex 节点 JobVertex 对象的创建是在 createJobVertex() 方法中实现的,这个方法实现比较简单,创建相应的 JobVertex 对象,并把相关的配置信息设置到 JobVertex 对象中就完成了,这里就不再展开详细介绍了。
connect() 方法在执行的时候,它会遍历 transitiveOutEdges 中的 StreamEdge,也就是这个 ChainNode 的 out StreamEdge(这些 StreamEdge 是不能与前面的 ChainNode Chain 在一起)
1 2 3 4 5 6 7 8 9 10 11 12 13 14 15 16 17 18 19 20 21 22 23 24 25 26 27 28 29 30 31 32 33 34 35 36 37 38 39 40 41 42 43 44 45 46 47 48 49 50 51 52 53 54 55 56 57 58 private void connect (Integer headOfChain, StreamEdge edge) physicalEdgesInOrder.add(edge); Integer downStreamvertexID = edge.getTargetId(); JobVertex headVertex = jobVertices.get(headOfChain); JobVertex downStreamVertex = jobVertices.get(downStreamvertexID); StreamConfig downStreamConfig = new StreamConfig(downStreamVertex.getConfiguration()); downStreamConfig.setNumberOfInputs(downStreamConfig.getNumberOfInputs() + 1 ); StreamPartitioner<?> partitioner = edge.getPartitioner(); ResultPartitionType resultPartitionType; switch (edge.getShuffleMode()) { case PIPELINED: resultPartitionType = ResultPartitionType.PIPELINED_BOUNDED; break ; case BATCH: resultPartitionType = ResultPartitionType.BLOCKING; break ; case UNDEFINED: resultPartitionType = streamGraph.isBlockingConnectionsBetweenChains() ? ResultPartitionType.BLOCKING : ResultPartitionType.PIPELINED_BOUNDED; break ; default : throw new UnsupportedOperationException("Data exchange mode " + edge.getShuffleMode() + " is not supported yet." ); } JobEdge jobEdge; if (partitioner instanceof ForwardPartitioner || partitioner instanceof RescalePartitioner) { jobEdge = downStreamVertex.connectNewDataSetAsInput( headVertex, DistributionPattern.POINTWISE, resultPartitionType); } else { jobEdge = downStreamVertex.connectNewDataSetAsInput( headVertex, DistributionPattern.ALL_TO_ALL, resultPartitionType); } jobEdge.setShipStrategyName(partitioner.toString()); if (LOG.isDebugEnabled()) { LOG.debug("CONNECTED: {} - {} -> {}" , partitioner.getClass().getSimpleName(), headOfChain, downStreamvertexID); } }
真正创建 JobEdge 和 IntermediateDataSet 对象是在 JobVertex 中的 connectNewDataSetAsInput() 方法中,在这里也会把 JobVertex、JobEdge、IntermediateDataSet 三者连接起来(JobGraph 的 graph 就是这样构建的):
1 2 3 4 5 6 7 8 9 10 11 12 13 14 15 public JobEdge connectNewDataSetAsInput ( JobVertex input, DistributionPattern distPattern, ResultPartitionType partitionType) IntermediateDataSet dataSet = input.createAndAddResultDataSet(partitionType); JobEdge edge = new JobEdge(dataSet, this , distPattern); this .inputs.add(edge); dataSet.addConsumer(edge); return edge; }
到这里,createChain() 方法就执行完了,在 JobGraph 总共会涉及到三个对象:JobVertex、JobEdge 和 IntermediateDataSet,最后生成的 JobGraph 大概下面这个样子:
JobGraph 的其他配置 执行完 setChaining() 方法后,下面还有几步操作:
setPhysicalEdges(): 将每个 JobVertex 的入边集合也序列化到该 JobVertex 的 StreamConfig 中 (出边集合已经在 setChaining 的时候写入了);setSlotSharingAndCoLocation(): 为每个 JobVertex 指定所属的 SlotSharingGroup 以及设置 CoLocationGroup;configureCheckpointing(): checkpoint相关的配置;JobGraphGenerator.addUserArtifactEntries(): 用户依赖的第三方包就是在这里(cacheFile)传给 JobGraph;
这几个方法的实现比较简单,这里简单看下 configureCheckpointing() 这个方法,其他三个就不再叙述了。
1 2 3 4 5 6 7 8 9 10 11 12 13 14 15 16 17 18 19 20 21 22 23 24 25 26 27 28 29 30 31 32 33 34 35 36 37 38 39 40 41 42 43 44 45 46 47 48 49 50 51 52 53 54 55 56 57 58 59 60 61 62 63 64 65 66 67 68 69 70 71 72 73 74 75 76 77 78 79 80 81 82 83 84 85 86 87 88 89 90 91 92 93 94 95 96 97 98 99 100 101 102 103 104 105 106 107 108 109 110 111 112 113 114 115 116 117 118 119 120 121 122 123 124 125 126 127 128 129 130 131 132 133 134 135 136 137 138 private void configureCheckpointing () CheckpointConfig cfg = streamGraph.getCheckpointConfig(); long interval = cfg.getCheckpointInterval(); if (interval < MINIMAL_CHECKPOINT_TIME) { interval = Long.MAX_VALUE; } List<JobVertexID> triggerVertices = new ArrayList<>(); List<JobVertexID> ackVertices = new ArrayList<>(jobVertices.size()); List<JobVertexID> commitVertices = new ArrayList<>(jobVertices.size()); for (JobVertex vertex : jobVertices.values()) { if (vertex.isInputVertex()) { triggerVertices.add(vertex.getID()); } commitVertices.add(vertex.getID()); ackVertices.add(vertex.getID()); } CheckpointRetentionPolicy retentionAfterTermination; if (cfg.isExternalizedCheckpointsEnabled()) { CheckpointConfig.ExternalizedCheckpointCleanup cleanup = cfg.getExternalizedCheckpointCleanup(); if (cleanup == null ) { throw new IllegalStateException("Externalized checkpoints enabled, but no cleanup mode configured." ); } retentionAfterTermination = cleanup.deleteOnCancellation() ? CheckpointRetentionPolicy.RETAIN_ON_FAILURE : CheckpointRetentionPolicy.RETAIN_ON_CANCELLATION; } else { retentionAfterTermination = CheckpointRetentionPolicy.NEVER_RETAIN_AFTER_TERMINATION; } CheckpointingMode mode = cfg.getCheckpointingMode(); boolean isExactlyOnce; if (mode == CheckpointingMode.EXACTLY_ONCE) { isExactlyOnce = true ; } else if (mode == CheckpointingMode.AT_LEAST_ONCE) { isExactlyOnce = false ; } else { throw new IllegalStateException("Unexpected checkpointing mode. " + "Did not expect there to be another checkpointing mode besides " + "exactly-once or at-least-once." ); } final ArrayList<MasterTriggerRestoreHook.Factory> hooks = new ArrayList<>(); for (StreamNode node : streamGraph.getStreamNodes()) { if (node.getOperatorFactory() instanceof UdfStreamOperatorFactory) { Function f = ((UdfStreamOperatorFactory) node.getOperatorFactory()).getUserFunction(); if (f instanceof WithMasterCheckpointHook) { hooks.add(new FunctionMasterCheckpointHookFactory((WithMasterCheckpointHook<?>) f)); } } } final SerializedValue<MasterTriggerRestoreHook.Factory[]> serializedHooks; if (hooks.isEmpty()) { serializedHooks = null ; } else { try { MasterTriggerRestoreHook.Factory[] asArray = hooks.toArray(new MasterTriggerRestoreHook.Factory[hooks.size()]); serializedHooks = new SerializedValue<>(asArray); } catch (IOException e) { throw new FlinkRuntimeException("Trigger/restore hook is not serializable" , e); } } final SerializedValue<StateBackend> serializedStateBackend; if (streamGraph.getStateBackend() == null ) { serializedStateBackend = null ; } else { try { serializedStateBackend = new SerializedValue<StateBackend>(streamGraph.getStateBackend()); } catch (IOException e) { throw new FlinkRuntimeException("State backend is not serializable" , e); } } JobCheckpointingSettings settings = new JobCheckpointingSettings( triggerVertices, ackVertices, commitVertices, new CheckpointCoordinatorConfiguration( interval, cfg.getCheckpointTimeout(), cfg.getMinPauseBetweenCheckpoints(), cfg.getMaxConcurrentCheckpoints(), retentionAfterTermination, isExactlyOnce, cfg.isPreferCheckpointForRecovery(), cfg.getTolerableCheckpointFailureNumber()), serializedStateBackend, serializedHooks); jobGraph.setSnapshotSettings(settings); }
到这里,StreamGraph 转换为 JobGraph 的流程已经梳理完成了,个人感觉这部分还有一些绕的,不过这种开源代码,只要看多几遍,多 debug 看看具体的执行流程,基本都可以搞明白。
参考